A Seed Saving Guide for Gardeners and Farmers - Organic Seed Alliance
PUBLICATION DATE: 2010; Revised: 2026
AUTHORS: Micaela Colley, Dr. John Navazio, and Lisa DiPietro, Organic Seed Alliance
REVISED BY: Katie Jagger, Jess Hughes, and Aba Kiser, Organic Seed Alliance
Photos courtesy of Micaela Colley (OSA)
Copyright © 2010, 2026.
Introduction to the Guide
Organic Seed Alliance works to put the power of seed into the hands of growers. Teaching farmers and home gardeners to produce and save their own seed is an important component of that work. We teach seed-saving skills in workshops around the country, and through publications such as this. In doing so, we aim to help preserve crop biodiversity, diversify farm income, and increase farmer and gardener involvement and investment in regional seed systems.
This guide outlines most of what you need to know to grow seed successfully. It covers the basics of seed growing, from choosing appropriate varieties for seed saving to harvesting, processing, and storing seed. It assumes that you have basic knowledge of vegetable growing. Most of the information in this manual was developed based on the seed-growing region of the Pacific Northwest, but provides information that can be applied broadly elsewhere and adapted to fit your climate. This manual spans knowledge that can help inform the everyday gardener to the experienced seed farmer.
The information contained in this guide was gleaned from numerous print and web resources, as well as from conversations with many prominent seed experts. We have endeavored to provide you with the best and most reliable information, but this guide is in no way a rigid formula for seed growing perfection. As you gain seed growing experience, you will find that your own personal knowledge of “reality on the ground” is just as important as recommendations from experts. Only through experimentation can you learn which practices work best in your climate and farming system.
This publication was made possible through generous contributions to Organic Seed Alliance from donors who support organic seed systems by preserving the art, history, and science of seed saving.
So, without further ado, we welcome you to the magical world of seeds. May this guide help you on your way to many seasons of delight and discovery in your gardens and fields.
– Organic Seed Alliance
Open-Pollinated Varieties and Hybrid Varieties: How to choose a variety that will grow “true” from seed
Open-pollinated (OP) varieties are pollinated by wind, insects, birds, and other pollinators, or are self-pollinating.
Stabilized OPs produce offspring that closely resemble the parents. For example, if a gardener grows the OP bean variety ‘Kentucky Wonder’ and saves seed, when planted the following year, the ‘Kentucky Wonder’ beans will look very much like the beans harvested the previous year. Stabilized OP varieties result from the combination of parents that are genetically similar and share specific traits that distinguish the variety.
Grex, Ultra-Crosses, and populations are very genetically diverse OPs. Seeds saved from these populations have the potential to adapt easily to diverse environments, but are less likely than stabilized OPs to look exactly like their parent plants.
Hybrid varieties result from the controlled crossing of genetically distinct parents. They usually produce offspring very different from their parents. For example, if a gardener grows the hybrid tomato variety ‘Early Girl’ and saves seed, very few of the plants grown from that seed will closely resemble ‘Early Girl.’ Many modern hybrid varieties will not make pollen, making seed saving impractical and sometimes impossible. In general, unless you are interested in working with plants that don’t produce pollen or working on a long-term breeding project, avoid saving seeds of hybrids.
Annuals and Biennials: How long it takes for your crop to produce seed & how to manage crops that take two growing seasons to set seed
An annual crop requires only one growing season to produce seed and complete its lifecycle. Examples of annual seed crops include corn, beans, squash, tomatoes, and broccoli.
A biennial crop requires two growing seasons to produce seed and complete its lifecycle. Examples of biennial crops include carrots, beets, chard, kale, and cabbage. In the first season, a biennial grows into the plant that we normally eat. If the following three criteria are met, a biennial will flower and set seed in the second season:
- Sized Appropriately: By the autumn of the first season, the plant must be appropriately sized. Plants that are too small in the autumn season may not reach full size before flowering, resulting in lower seed yields. In other cases, very small plants may not respond to vernalization, never flowering and setting seed. Plants that are too large may not be hardy enough to survive in the field over the winter. For crop-specific information on appropriate sizing of common biennials and other overwintering tips, see Specific Crops: Seed Saving Tips.
- Vernalization: The plant must go through an important period of vernalization (exposure to cold) before it will flower. The specific amount of time that biennial crops need to become vernalized varies by crop and variety. Exposure to temperatures below 50°F (10°C) for at least 8 to 12 weeks is adequate for all common biennial vegetable crops.
- Overwintering: The plant must survive the winter. Successful overwintering mainly depends on cool (but not too cold) temperatures. In areas where winter temperatures do not regularly drop below 14°F (-10°C), most biennial crops may remain in the field over the winter. In this case, the plants must be small (i.e., hardy) enough to withstand cold temperatures. Where temperatures do regularly drop below 14°F (-10°C), the crop must be lifted and stored in a cool (but not freezing) location. Digging up the crop for storage offers an opportunity to discard any plants that show undesirable characteristics in root shape, flavor, size, and texture, and to check for insect or disease infestations. Storing your crop over the winter may also provide better protection from pests and disease. Replant your stored roots in the spring.
Storing biennial crops over winter
Biennial plants are commonly trimmed in some manner before storing over winter. Trimming is done to reduce the rate of transpiration and reduce the amount of vegetative material subject to rotting. For biennial root crops (also called stecklings), the tops are commonly trimmed to about 1 inch. Once prepared for storage, your biennial should ideally be stored at between 35-38°F (1.5-3°C) and at 90-95% relative humidity. For this, you can use an electric cooler with a humidity control. In the cooler, place totes packed with clean, sound stecklings. Under high humidity conditions, standing water can accumulate on the surface of the uppermost layer of roots. Covering the totes with a two- to three-inch layer of clean wood shavings (avoid sawdust) will help absorb this extra moisture and reduce rot problems. We recommend cedar wood shavings, if available, as cedar is reported to have a higher level of anti-microbial factors than most other types of wood. Cedar shavings can usually be purchased at pet stores.
You can also store stecklings in traditional root cellars, which benefit from cold temperatures and high humidity. In root cellars, carrot stecklings are traditionally stored in moist, clean sand or clean, undecayed deciduous leaves (in New England, growers sometimes use maple leaves). The roots are laid carefully between layers of this material so they do not touch each other.
Days to harvest
Whether a crop is an annual or a biennial, it is also important to consider how many days of warm weather it needs before it will produce harvestable seed. Some crops like cilantro can require only 100 days to produce seed. Other crops, like dry beans, can require 4 months or more to reach maturity. If you live in a region with a cool and/or short growing season, you will need to experiment to see which crops can produce good yields of seed in your climate. Starting plants early in a greenhouse will help give your crops a head start.
Botany Vocabulary: Basic botanical terms
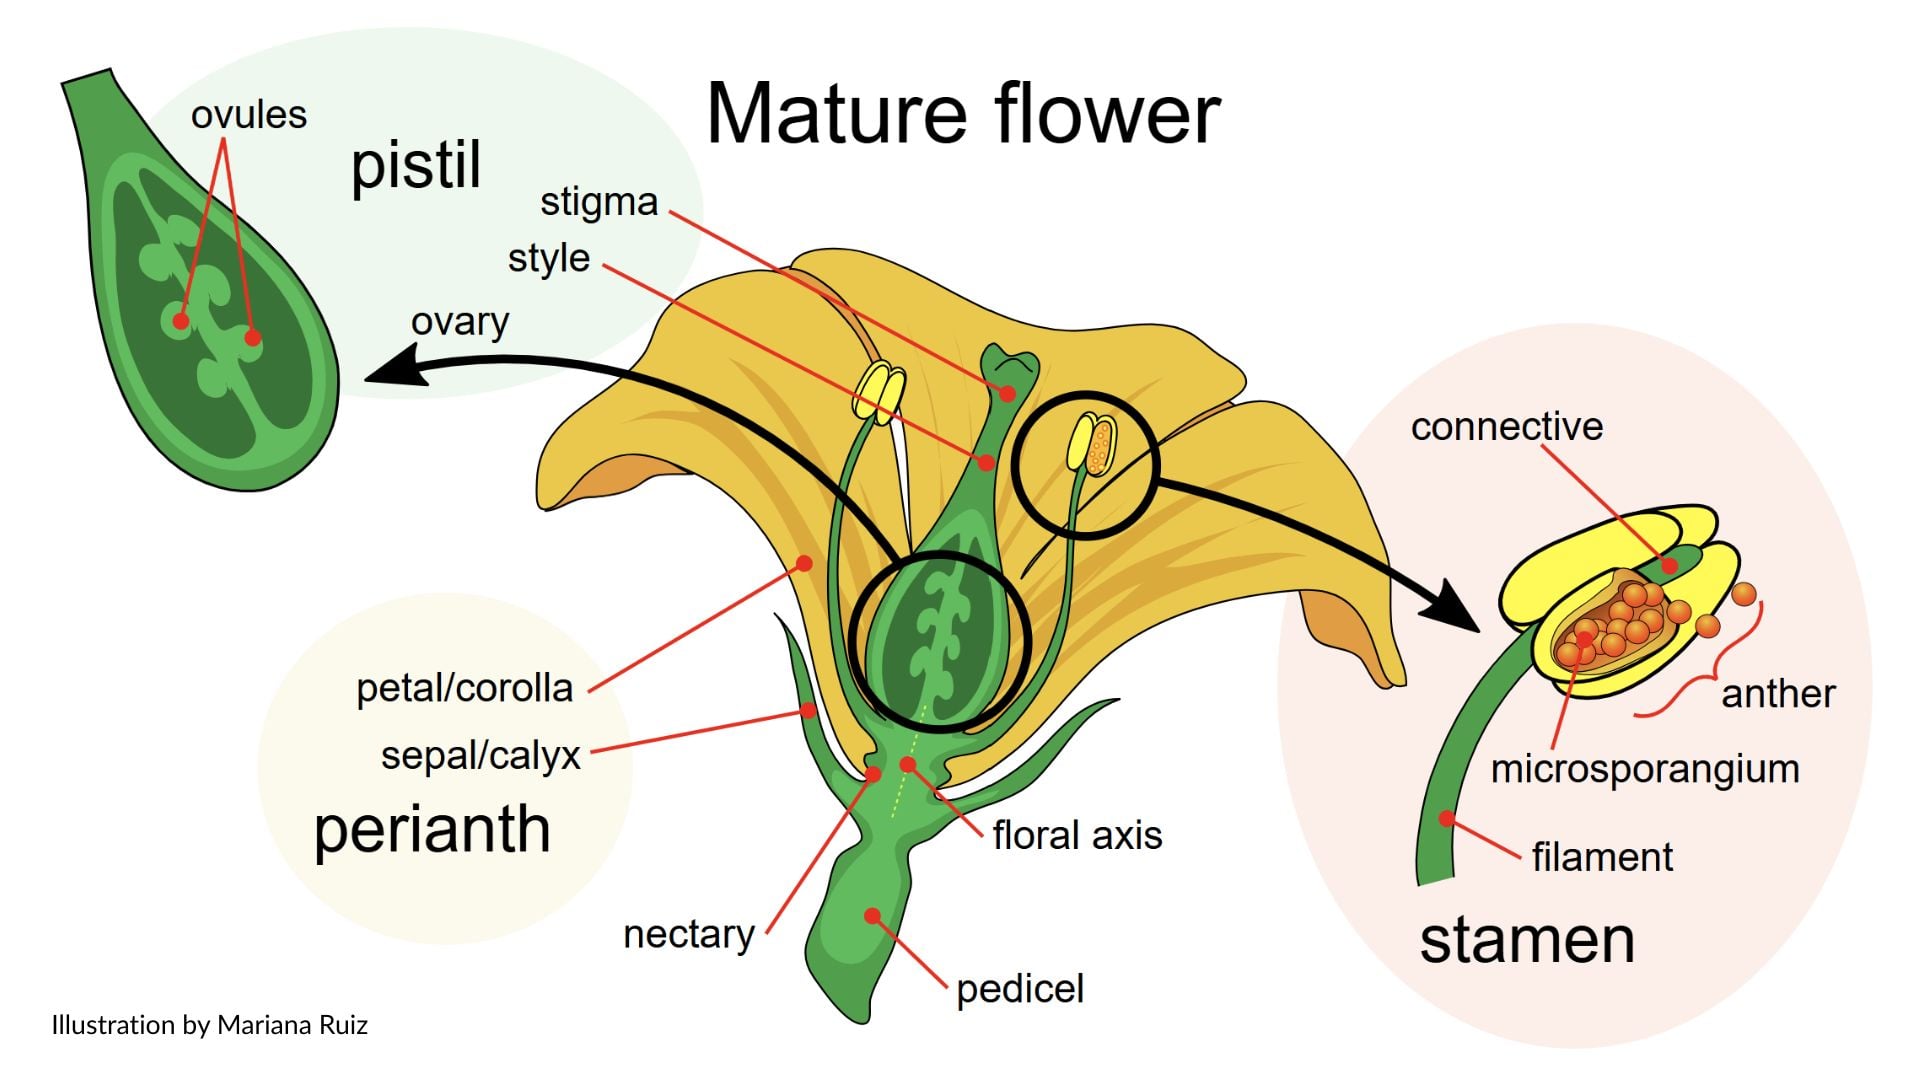
Perfect flower: A flower that has pollen and seed-producing parts, i.e., both stamen and pistil.
Staminate flower: A flower that makes pollen but not seed.
Pistillate flower: A flower that makes seed but not pollen.
Monoecious: In monoecious crops, each plant bears both staminate and pistillate flowers. Examples include corn, cucumbers, and squash.
Dioecious: In dioecious crops, individual plants bear either only staminate flowers or only pistillate flowers. In other words, a single plant from a dioecious crop will produce pollen or seed, but not both. Examples include asparagus, spinach, and date palms.
Pollination: Pollination is the process by which pollen is transferred from the stamen to the pistil in plants, thereby enabling subsequent fertilization and reproduction.
Pollen tube: The pollen tube forms from a germinating pollen grain on the stigma and acts as a conduit to transport sperm cells to the ovules.
Fertilization: Fertilization is the process by which sperm cells travel through the pollen tube to the ovary. Fertilization is complete when the sperm fuses with an ovule, eventually leading to the formation of a seed.
Stamen: The stamen is the structure of a flower where the pollen is held. It is made up of: 1) the anther, which produces pollen, which contains the plant’s sperm, 2) the filament, which supports the anther.
Pistil: The pistil is the seed-producing structure of a flower. It is made up of: 1) the stigma, which receives pollen, 2) the style, which connects the stigma to the ovary, 3) the ovary, which matures into a fruit, and contains 4) ovules that fuse with sperm to become seeds.
Self-pollinating and outcrossing: Understand your crop’s pollination system
Plants vary in how they receive pollen. Some species primarily receive pollen from the same flower or plant (self-pollination), while others primarily receive pollen from another plant of the same species (cross-pollination). The way that a plant receives pollen falls along a spectrum between strongly self-pollinating and strongly outcrossing.
At one end of the spectrum are plant species that largely self-pollinate, generally because their perfect flowers remain closed or only open slightly, limiting opportunities for outcrossing. Next along the spectrum are many crop species with perfect flowers that open at maturity, allowing high levels of outcrossing by wind and pollinating insects, while still retaining the ability to inbreed when self-pollinated. Some of these crops with open perfect flowers will inbreed at a lower rate if the pollen- and seed-producing parts mature at different times. Monoecious crops fall farther toward the outcrossing end of the spectrum, as the staminate and pistillate flowers are physically separated, although they can still inbreed when self-pollinated.
At the strongly outcrossing end of the spectrum are a notable minority of crop species with mechanisms that enforce outcrossing. Some crops have self-incompatibility, a biochemical system that prevents them from accepting their own pollen, thereby preventing self-fertilization under most circumstances. The most complete system for enforcing outcrossing is dioecy, in which individual plants produce either staminate or pistillate flowers. A plant’s place on this spectrum has important implications for its management as a seed crop.
Inbreeding
In plants, inbreeding (also called self-pollination or selfing) occurs when the pollen of an individual plant fertilizes an ovule of the same plant. Essentially, the plant pollinates itself. An inbreeding plant’s offspring receive all of their genes from that one parent; thus, the progeny is very similar to its parent.
Two important advantages of inbreeding include:
- In plants that have evolved to become extremely well adapted to their environment, inbreeding offers a way to ensure that a plant’s offspring will be just as well adapted as its parents. In other words, it is a way of replicating success.
- Inbreeding helps to ensure reproduction in varying circumstances, as it does not require the presence of wind, insects, or animals to transfer pollen from one plant to another.
Strong Inbreeders. The plants that we call “strong inbreeders” rely almost completely on self-pollination to reproduce. The flowers of these plants have ways of excluding pollen from other flowers of the same species. For example, in the flowers of most modern tomato varieties, the anthers form a cone around the pistil, effectively sealing off the flower’s stigma from any pollen besides its own. In peas, the petals of the flower are typically closed during the period when the stigma is receptive to pollen, giving pollen from its own anthers exclusive access for pollination. When the pea flower opens, it is already fertilized. Other examples of strongly inbreeding plants include lettuce, common beans, and wheat.
Even a strong inbreeder, however, will occasionally cross with another plant of the same species. For example, bees can eat through or tear open a strong inbreeder’s flower petals and deposit pollen from a different plant. Also, under certain climatic conditions, an inbreeder’s flower may open and be receptive, allowing the stigma to receive pollen from another plant before it has been self-pollinated by its own anthers. And, of course, a human with the intention of creating a new cross can transfer pollen from one strongly inbreeding plant to another.
Outcrossing
In plants, outcrossing occurs when the pollen of one plant fertilizes an ovule of a different plant of the same species (also called cross-pollination or outbreeding). In other words, a plant crosses with another plant of the same species. When plants outcross, they produce offspring that are genetically different from both parents. In general, all plants have the potential to outcross, because every plant can be fertilized by another plant of the same species.
The central advantage of outcrossing is that it facilitates a plant species’ ability to adapt to changing environments. Plant species that continually generate new combinations of genes increase the likelihood that some individuals in each generation will possess traits that help them withstand new environmental challenges.
Strong Outcrossers. The plants that we call “strong outcrossers” rely completely or almost completely on cross-pollination to produce seed. Dioecious plants and plants that are self-incompatible have eliminated any chance of self-pollination; they exclusively outcross. Strong outcrossers that are not dioecious have ways of discouraging (though not eliminating) self-pollination. For example, corn, which is monoecious, has the tassel (which sheds pollen) and ear (which produces seed) situated on different parts of the plant, relatively far away from each other. The tassels mature and release the majority of their pollen before the flowers (the ears) are receptive to pollen. These strategies help to ensure that little self-pollination occurs in corn. Other examples of strong outcrossers include beets, broccoli, and spinach.
As stated above, strong outcrossers that are not dioecious or self-incompatible will self-pollinate. The likelihood of self-pollination increases as the opportunity to receive pollen from other plants of the same species decreases. For example, if a corn plant is isolated from other corn plants, all of its offspring will be self-pollinated.
The Plants In-Between
Between the “strong inbreeder” side of the spectrum and the “strong outcrosser” side of the spectrum are plants that will self-pollinate some of the time and cross-pollinate other times. For example, in an average field of fava beans, about 50-75% of the flowers will likely be self-pollinated, and 25-50% of the flowers will be cross-pollinated, thanks mainly to bees.
Classifications in the Crop-Specific Chart
In the Crop-Specific Chart, we have classified many major crops into the following five categories: Strongly self-pollinating; Generally self-pollinating; Both self-pollinating and outcrossing; Generally outcrossing; and Strongly outcrossing. In reality, the place of many plant species in one of these categories is mutable, as many species’ level of selfing or outcrossing varies greatly depending on environmental conditions. Nevertheless, these classifications are a good way to help you become familiar with the tendencies of your seed crop.
Pollination and Fertilization: How to promote a good seed set
If your crops are not adequately pollinated and fertilized, they will not produce viable seed. Your plants must overcome two hurdles for fertilization to occur: First, pollen must land on the stigma (pollination); second, the generative cell in the pollen grain must travel to and fuse with the ovule (fertilization).
Pollination needs for strong inbreeders
While the journey of the pollen of a strong inbreeder is undoubtedly short (usually from an anther to a stigma within the same flower), good pollen coverage of the stigma often requires some external movement. Movement caused by wind, and in some cases insect visitation (even when the insect is unable to open the flower), can substantially increase pollination and promote good seed set.
Make sure you address the need for external movement of your strongly inbreeding crop. If your crop is being grown in a location with no wind and few insects (such as a greenhouse), you may need to use a fan or manually shake the plants. You may also need to encourage a diversity of insects in your garden or farm so that more of them will jostle your crop’s flowers.
Pollination needs for plants that depend to some degree on outcrossing
The more a crop relies on outcrossing for reproduction, the more important are the following three elements in ensuring a good seed set:
- A sufficiently large population of the crop flowering in unison,
- Adequate insect populations visiting the crop or adequate wind/airflow
- Environmental conditions that allow pollen to remain viable from the time it leaves an anther until it reaches a stigma (if it is too hot or too dry, pollen may lose viability before reaching a receptive stigma).
Study the specific pollination needs for your outcrossing crop and make sure to address all three requirements for good pollination. Depending on your situation, you may need to grow more plants than originally planned, encourage a diversity of pollinating insects, discontinue overhead watering during flowering (insects don’t fly well when the sprinklers are on), use a fan to introduce wind if growing seed in an enclosed structure, change your planting date to assure better environmental conditions during flowering, and in some cases, pollinate by hand. You may find that your climate is not conducive for pollination of a certain crop. If so, you will need to choose a different crop from which to save seed.
Fertilization needs for all crops
Regardless of mating system, once pollen has reached the stigma, requirements for fertilization are the same for all crops: Environmental conditions must be right for the pollen to germinate and grow a pollen tube, and for the sperm to remain viable as it makes its journey to the ovule. If it is too hot or too cold, the pollen tube may stop growing, and the sperm will not reach the ovule. For instance, a heat-loving crop like tomatoes may produce fewer fruit and low seed yields when it is exposed to cold nighttime temperatures during flowering. Cold temperatures prevent the pollen tubes carrying tomato sperm cells from completing their journey from stigma to ovule. In general, the climatic needs of your crop for fertilization are similar to the climatic needs of your crop for normal vegetable production. If your climate is not conducive to crop fertilization, you may need to reconsider it as a seed crop.
Isolation, Population Size and Roguing: How to maintain your crop’s genetics
Isolation from contaminating pollen
Isolation involves protecting your seed crop from the pollen of plants of the same species that you did not intend it to cross with. In other words, isolation keeps contamination of your crop’s genetics to a minimum. First, we will discuss how you can identify the plants that will cross with your crop, then we will discuss the isolation methods you can use to protect your crop from receiving pollen from those plants.
Plants that can cross-pollinate with your seed crop
To know which plants’ pollen might potentially contaminate your crop, you must learn the scientific name of your crop and find out which plants share that scientific name and are therefore of the same species. The scientific name of a species is formed by the combination of two terms: the first term is the plant’s genus, the second is its specific epithet. These two names are usually Latin in origin and, used together, designate the species binomial name that is recognized by botanists worldwide.
Plants that share your crop’s binomial name (both its genus and specific epithet) are the same species as your crop. For example, cabbage, European kale, broccoli, Brussels sprouts, and cauliflower are all the same species— they share the scientific name Brassica oleracea. Therefore, if you wanted to grow cabbage seed, you would need to isolate it from European kale, broccoli, Brussels sprouts, and cauliflower. Domesticated carrot and wild carrot (commonly known as Queen Anne’s Lace) are both Daucus carota; hence, carrot seed crops must be isolated from Queen Anne’s Lace. The binomial scientific name of most common vegetable crop species can be found in the Crop-Specific Chart.
Look for potentially contaminating plants among these three groups:
- Wild plants in your area that are the same species
- Other varieties of the same species that you may be growing
- Other varieties of the same species that others in your area may be growing.
Isolation Methods
Isolating with time
To isolate two varieties of the same species by time, plant one variety earlier than the other. The first variety must be planted early enough that it has completed its pollination period and set seed before the second variety begins to flower. Some examples of crops that can easily be isolated using timing include corn, sunflowers, and basil, but you must be observant to make sure that they are not flowering at the same time.
Isolating with physical barriers
You can isolate your crops using physical barriers such as paper or cloth bags, cages of very fine mesh, rows of thickly planted flowers, shrubs or trees, buildings, etc. Physical barriers such as thick vegetation, hills, or buildings can at least partially block foreign pollen-bearing wind and insects. Bags and cages can virtually eliminate any contamination from foreign pollen, but they have several drawbacks: First, they often require involved pollination techniques. For example, seed growers who use cages to isolate carrots must release fly larvae inside the cages to allow for pollination. Second, using bags and cages makes maintaining an adequately sized population more difficult, as these strategies require a larger per-plant investment of time and materials. And third, pest and disease management inside the enclosures can be more involved; for example, aphid populations can increase rapidly when beneficial insects are excluded. For more information on using bags and constructing and using isolation cages, see Seed to Seed by Suzanne Ashworth.
Isolating with distance
You can use distance to isolate your crops by planting them sufficiently far away from sources of contaminating pollen. The distance required for effective isolation varies from species to species. A general guideline, however, is that plants that mostly self-pollinate require less isolation, while plants that mostly outcross require more isolation. For plants that tend to outcross, those that are primarily insect-pollinated require less isolation than those that are primarily wind-pollinated. Ideal isolation distances are not absolute, and cross-pollination can occur even when recommended isolation distances are observed! Isolation requirements can vary with environmental conditions, and expert recommendations for the same crop vary widely.
We have provided two sets of recommendations on isolation distances for most commonly grown vegetable species in the Crop-Specific Chart. Our recommendations for home use are based on the assumption that your seed-saving goal is to maintain a pure variety and manage your crop with a fair degree of assurance that you won’t have crossing with a nearby variety of the same species. For species that tend to outcross, we have recommended distances for home use that are adequate, yet not prohibitive, to avoid most cross-pollination and allow one to scout and manage potential sources of contaminating pollen within the recommended radius. For species that tend to self-pollinate, we have recommended distances for home use that are adequate both to avoid most cross-pollination and to help prevent accidental mixing of seeds during harvest. Our recommendations for commercial production are based on the assumption that commercial seed growers require a greater degree of certainty that cross-pollination will not occur.
In some situations, you may be able to get away with a somewhat shorter distance than those that we recommend. Shorter distances may be adequate if you have any of the following conditions:
- Prominent physical barriers between varieties such as a forest or thick vegetation, hills, or a dense set of buildings
- The number of plants of a nearby variety of the same species is so small that the amount of potentially contaminating pollen is minimal.
- The nearby plants are very similar to the plants you are saving seed from, and it is okay if there is a small amount of out-crossing with another variety. For example, the seed will be used to produce vegetables in the following season, and not used to grow seed again.
However, one should only lessen the isolation distance after careful consideration of the environmental conditions. If using less distance, it is best to try the new isolation scenario with a less important seed crop that you won’t distribute and that you have plenty of remnant seed to start over with if crossing occurs.
In other cases, you may need a greater distance to avoid contamination. You may need to expand the recommended isolation distance if you have any of the following conditions:
- An open landscape and/or high winds
- Extremely different types of varieties in the same species (such as zucchinis and pumpkins, which are both Cucurbita pepo)
- You are in proximity to a GMO variety of the same species
- There are extremely high levels of pollinator activity in the area.
In the event of accidental crosses, you may be able to work your way back to a pure variety by removing off-type plants in following generations. The number of generations required to remove an unwanted cross will depend on the degree of crossing and whether your crop is predominantly a self-or cross-pollinated species. Ultimately, isolation distances are a risk management tool, and only you can assess what level of risk is acceptable for the seed you are saving.
Population Size
Why population size matters
Maintaining an adequately sized population entails saving seed from enough plants to retain your variety’s genetic variability. Genetic variability refers to genetic differences among plants in the same variety. For instance, one plant of the Red Russian Kale variety may differ from another of the same variety in flavor, vigor, resistance to insects and disease, tolerance to drought, or other important traits. There are two reasons why maintaining genetic variability is important:
Adaptability
Genetic variability allows a variety to adapt to changing conditions. For example, imagine two different populations of a lettuce variety, one large (100 plants) and one small (10 plants). Now imagine that the disease downy mildew attacks both populations. In the large population, despite the disease, five plants survive to produce seed, and in the small population, no plants survive. Why? In a larger population, there is a greater chance that some plants will naturally possess a gene that provides resistance to downy mildew. In our example, thanks to genetic variability, five plants in the large population have a genetic component that confers some level of resistance to downy mildew, enabling them to survive and reproduce. If downy mildew strikes again next season, plants grown from the survivors’ seed are more likely to survive the outbreak. In the small population, the odds that a few plants will have the genetic factors to survive downy mildew are lower; indeed, in our example, none of the plants had adequate resistance to downy mildew, so none survived. There was not enough genetic variability within the smaller population to have adequate resistance to contend with the disease. So, in larger populations, there is often greater genetic variability, which increases the chance that some plants within the population will have some combination of genetic factors that will enable a subset of the population to contend with possible environmental challenges.
Inbreeding depression
Genetic variability in any given population also prevents inbreeding depression. Inbreeding depression is frequently expressed as a loss in vigor and fertility due to the mating of individuals that are closely related and too genetically similar. Plants suffering from inbreeding depression often germinate poorly, produce little or no seed, and will succumb more quickly to various environmental stresses. Plants on the strong outbreeder side of the mating spectrum are most susceptible to inbreeding depression, as they are adapted to a constant mixing of genes through cross-pollination. Plants that are strongly self-pollinating are the least susceptible, as they have adapted to the inbred condition through thousands of generations of self-pollination. A notable exception to this rule is the crops of the Cucurbitaceae (cucumbers, gourds, melons, squashes, and watermelons), as these crops are largely outcrossers, but are not as severely affected by inbreeding.
The right population size for genetic vitality
We have provided recommendations of minimum population sizes for most common vegetable crops in the Crop-Specific Chart. Using the recommended population sizes helps to ensure good maintenance of the genetic base of your crop. Some of our population recommendations, however, may seem prohibitively large. Keep in mind, then, that the right population size for your system depends on how important you consider maintaining genetic variability. It also depends on space restrictions in your garden or farm. If you cannot grow as many plants as we recommend, try growing as many plants as possible in the space you have available and see what happens. Stay vigilant for signs of inbreeding depression, such as reduced reproductive capacity (lowered seed yield or fewer flowers), reduced vigor, and general crop health. If you notice signs of inbreeding depression, you can try introducing seed of the same variety from an outside source to reinvigorate your variety. It is also possible to save seed from a smaller number of plants if there is already a large degree of genetic variation within a population. Still, as you see that variation diminish over time, larger population sizes could be needed.
The right number of seeds to plant
Please note that the recommendations in our Crop-Specific Chart are for the final number of plants from which you should harvest seed, not the initial number that you plant in the spring. The decision of how many plants to start with in the spring is a judgment call that you will make based on these two factors:
Environmental conditions
You may lose plants due to bad weather, pests, poor winter storage conditions (for biennials), accidents, elimination of off-types, etc. You should always allow for some attrition over the course of the season.
Condition of the variety
Some plant varieties produce a crop in which almost all of the plants perform as desired. This variety can be considered to be in good condition. Other varieties produce a crop in which some plants perform as desired, but many others perform poorly. This variety can be considered to be in poor condition. To properly maintain your crop’s varietal integrity, you should not save seed from poorly performing plants. Therefore, if your variety is in poor condition, you will need to begin with more plants than you would if your variety was in good condition.
Roguing: Removing off-types or underperforming plants
To “rogue” is to remove inferior or atypical plants from the population. Essentially, roguing involves walking through your planting and pulling out the plants that you don’t want to reproduce. Roguing can help eliminate the effects of accidental crosses that occurred in a previous generation, accidental mixing of seeds, or genetic variants that you don’t want in the population. If you do not rogue, your variety will change over time; Generally, without selection, a population will shift toward heavier seed set, stronger pest and disease resistance, but also harsh flavors, smaller fruit, and more fibrous stalks. Some helpful guidelines for roguing include:
Rogue more than once
It is often best to rogue varieties at more than one point in the season. For example, in a lettuce population, at the beginning of the season you may remove plants that are the slowest to germinate or lack vigor. Later in the season, you may remove (and eat) plants that have off-type foliage. Additionally, you may remove plants that appear to be the most affected by disease and any plants with off-flavor.
Rogue before flowering
Roguing of outcrossers should be done before flowering if possible. This way, both the rogue plants’ pollen and seed are eliminated from the next generation.
Consider variable conditions
Consider variable growing conditions in the field. Plants in a less optimal part of your field may perform poorly compared to their neighbors growing under better conditions, not necessarily due to inferior genetics but because they have had proportionately less sun, water, soil nutrients, etc. Conversely, plants in the best part of your field, or on the edge of an otherwise uniform field, may perform better not because of genetics, but because they have had the advantage of more sun, space, soil nutrients, etc.
Maintain population size
When considering how many plants to rogue, be careful not to select “too narrowly,” thereby maintaining healthy genetic variability in your variety. Do not remove so many plants that you no longer have an adequate number of plants from which to harvest seed. It is important to remember that, under most circumstances, no single plant will be ideal for every important characteristic of the variety you are maintaining. All non-hybrid, open-pollinated varieties have inherent variation. In fact, the ideotype (idealized appearance of a crop variety) is really just an average or approximation of what the variety looks like, and most individuals in any population of a variety will not fit the perfect ideotype.
Soil and Cultivation: Understand the in-field needs of your crop
The needs of your seed crop as it grows in the field are very similar to its needs as a vegetable crop. The basic in-field elements to consider about seed production include: soil preparation, spacing, staking and trellising, managing disease, and managing weeds.
Soil Preparation
Seed crops, like most vegetable crops, benefit from fertile, nutritionally balanced soil with good drainage, high organic matter, and a friable (crumbly) texture. Since seed crops are often in the ground longer than vegetable crops, make sure that you provide your plants with a slow-release source of fertility that can nourish them through their entire life cycle. Also be sure to provide an adequate source of phosphorus, as it is crucial for good flowering and seed set.
Striking the right balance in nitrogen availability is also very important for seed crops. Too little nitrogen will result in stunted plants and lower seed yields. Too much nitrogen can be deleterious as it:
- Encourages plants to produce vegetative growth rather than flowers and seeds
- Can make plants more susceptible to lodging (falling over)
- Can make plants more susceptible to attack by insect and disease pests.
All of these factors may result in lower seed yields. In general, if you provide the same amount of nitrogen (or slightly less) that is commonly recommended for your crop as a vegetable, you will probably strike the right balance between too much and too little nitrogen. As you transition to lower-input systems, remember that seeds saved from plants grown in those conditions are more likely to perform well in that same environment. Consider gradually reducing inputs used during soil preparation.
Spacing
In general, plants that have fruit or seed that we eat (such as tomatoes, beans, melons, sunflowers, etc.) don’t need any more space than you would normally provide for them as a vegetable crop. Plants that we normally never see the fruit of (such as broccoli, spinach, carrots, and beets) often greatly surpass their size as a vegetable crop as they reach full maturity, commonly reaching three feet in diameter. These crops will require extra space. You will need to experiment to determine the right spacing for your seed crops. One popular spacing strategy is to space your crops closely together initially and gradually thin (harvest and eat) them as the plants increase in size, leaving a final population adequately spaced for seed production.
Staking and Trellising
If your crop is going to get a lot bigger than it normally gets as a vegetable crop, it may need staking or trellising to help increase airflow and to keep it from falling over. Staking plants helps prevent disease, aids in the drying of the mature seed crop, and can make it easier to get into the field for late-season weed management if needed. In particular, species in the Brassicaceae (cabbage family), Apiaceae (carrot family), Chenopodiaceae (beet family), and Alliaceae (onion family) benefit from staking.
Managing Disease
Disease can impact seed crops by:
- Reducing seed yields
- Reducing seed viability
- Transferring disease to the next generation of plants
In cases where the crop is infected with a seed-borne disease (a disease that can live for extended periods of time on the seed itself), the plants grown from that seed will also be infected. The strategies you can use to protect seed crops from disease are generally the same as those that you would use for crops being grown as vegetables. There are, however, a few additional considerations for managing disease in seed crops:
- In most cases, your plants will be in the ground longer than they would be if they were being grown as vegetable crops. This means you’ll need to protect them from disease longer.
- You may need to stake or trellis crops that become dense, crowded, and/or top-heavy (and likely to fall over) to reduce disease risk.
- For plants that we normally don’t see the flowers/fruit/seed, you may confront a new set of flower/fruit/seed specific disease pathogens that you have not previously encountered.
- Once your seed is harvested and cleaned, if you suspect your seed crop may have been infected with a seed-borne disease, you may have a few options for control, two of which we will describe here:
- You may be able to wait the disease out by storing the seed for an extended period; some diseases will die in storage before the seed loses viability. An example is bacterial soft rot (Erwinia carotovora) on carrot seeds, which dies after two years of seed storage. Unfortunately, very little research has been done to investigate this method of disease management for seed-borne diseases of vegetables.
- You can treat the diseased seed with hot water. The purpose of hot water treatment is to submerge seed in water that is hot enough to kill the pathogen without seriously damaging the seed. When properly done, hot water treatments are effective, but they can be risky. Too high a temperature or too long a treatment time can kill the seed or reduce its viability.
Step-by-step instructions for conducting your own hot water treatments can be found in a publication from the University of Wisconsin: Hot-Water Seed Treatment for Disease Management.
To follow the University of Wisconsin methods, the basic materials you’ll need are a hot water bath or Sous Vide, a woven cloth bag, a laboratory thermometer (candy thermometers work), and a screen for drying seed. You can purchase a hot water bath or Sous Vide online. As a substitute for a hot water bath or Sous Vide, we have had success using a turkey roaster with temperature control, but consider using a thermometer to monitor the temperature. Others have used a pot of water on a stove, but be aware that it can be difficult to maintain a consistent temperature using this method, and seed should not be allowed to touch the bottom of the pan, which is in contact with the burner and therefore much hotter.
See eOrganic’s Organic Seed Resource Guide for more information on disease management in organic seed production.
Managing Weeds
Weeds impact seed crops by:
- Reducing seed yields
- Reducing seed viability
- Increasing disease risk
- Contaminating harvested crop seeds with weed seed
The strategies you can use to manage weeds in seed crops are generally the same as those that you would use for crops being grown as vegetables. There are, however, a few additional considerations for managing weeds in seed crops:
- Some seed crops will be in the ground much longer than if they were being grown as a vegetable. This means there is more time for multiple generations of weed seeds to germinate, and more time for weeds to mature and set seed.
- Some seed crops spend much of their growing season at heights that prevent easy mechanical cultivation.
- If weed seed is in your harvested seed lot, you will need to remove it during processing.
See eOrganic’s Organic Seed Resource Guide for more information on weed management in organic seed production.
Harvesting and Processing: Dry- and wet-seeded crop methods of harvesting and processing
A dry-seeded crop has seeds enclosed in pods or husks that are usually dried in place on the plant. Numerous vegetable plant families have dry-seeded fruits, including Poaceae (includes corn, rice, wheat), Fabaceae (includes beans, peas, lentils), and Brassicaceae (includes cabbage, mustard, kale). A wet-seeded crop has seeds that are embedded in the damp flesh of fruits. There are two vegetable plant families with wet-seeded fruits: Solanaceae (includes tomatoes, peppers, eggplants), and Cucurbitaceae (includes melons, squashes, cucumbers). Certain peppers can be treated as dry- or wet-seeded crops, as they can be either processed when they are fleshy or after they have dried.
Dry-seeded crops and wet-seeded crops require very different methods to get from harvest-ready plant to storage-ready seed. We will discuss the basics of harvesting and processing of dry- and wet-seeded crops in turn. You can find crop-specific harvesting information in Specific Crops: Seed Saving Tips.
Dry-Seeded Crops
Depending on your scale and personal interests, getting from “harvest-ready” in a dry-seeded crop to “storage-ready” seed can be as simple as going out to the garden every day, cracking open a few pods as they dry, stripping out the seeds into a small container, and then bringing them back in the house to finish drying. It can also be a much more intensive process involving harvesting, drying, threshing, and repeated cycles of winnowing, screening, and further drying when you are growing a larger seed plot. In either case, you will need to know when your seed crop is ready for harvest.
When to harvest
In deciding when to harvest your dry-seeded crop, you will need to ask yourself the following questions:
Do I have mature seed?
The elements that typically indicate dry-seeded crop maturity:
- Color of seed and/or seed pod. Depending on the crop, the color that indicates maturity may be beige, yellow, brown, black, or some shade in between.
- Dryness of seed and/or seed pod. Adequate dryness of some seeds, such as spinach or onion seed, is determined by cutting the seed open and seeing if the inside is starchy instead of milky. Adequate dryness of a seed pod is often determined by testing to see if one will easily shatter when rolled between one’s fingers. If they become too dry, some seed pods will break open or shatter and release their seeds before harvest.
- Ease of detachment of seed and/or seed pod from stalk. Adequate ease of detachment of seed in some crops, such as cilantro, beet, or Swiss chard, is determined by whether the seed comes off the stalk easily when rubbed vigorously.
How much of my seed is mature?
The seeds of a seed crop do not mature all at once, and for many dry-seeded crops, the span between the first ripe seed and the last ripe seed can be as long as 4-8 weeks. If you have time, you will get the most high-quality seed by doing multiple harvests; collecting the early-maturing seed when it is ripe, and coming back as many times as is practical to harvest later-maturing seed. Alternatively, you may be able to position a drop cloth in a manner that catches falling seed. Reemay, insect netting, sheets, or geotextile fabric are all effective materials for this purpose and are discussed further in the Harvesting section.
If your situation does not allow for multiple seed harvests, you will need to strike a balance between waiting for later-maturing seed to ripen and harvesting earlier-maturing seed before too much of it has either fallen off the plant or become too brittle to harvest or process. A general guideline is to harvest when 60-80% of your seeds are ripe.
How will rain and animals affect my ripening seed crop?
Adverse weather or animals interested in mature seed as food can force you to harvest your seed crop at a time other than peak maturity. Rains (or overhead watering) can damage seed quality once the seed begins to dry, so you may need to harvest before a rain, even if you were hoping to let your seed ripen longer. Alternatively, you may need to wait to harvest your crop until it has thoroughly dried after a rain, at which point it may be somewhat overripe. Organic Seed Alliance has a useful publication on this topic titled: Weather-Related Risk Reduction Guidelines for Dry-seeded Specialty Crops. Also, as your seed matures, birds, squirrels, and other animals may begin to use your crop as a food source. When hungry animals are after your seed, you may need to harvest it early and dry it in a protected place.
How to harvest
To harvest is to sever the seed’s connection to the ground. Harvest methods vary according to scale of harvest and type of crop, but some popular methods are listed below:
Smaller scale harvests:
- Strip seeds off into a bucket.
- Clip individual pods into a bucket.
- Clip seed heads into a bucket.
- Cut whole plants and place in buckets.
Medium scale harvests:
- Cut or uproot whole plants and make long rows on the dirt of the aisle.
- Cut or uproot whole plants and make long rows on tarps in the aisle.
Large-scale harvest:
- Use of a scythe or mechanical cutting bar to swath the crop into windrows.
How to prepare your crop for processing
Due to threatening weather, hungry animals, and concerns about loss of seed through shattering of mature seed pods, dry-seeded crops are usually harvested before all their seed is sufficiently dry and mature. The crops usually need additional curing time before they are ready for processing. The seed must be dry and hard enough to withstand processing, and the plant material it’s attached to must be brittle enough to shatter and break away from the seed easily. The curing time also gives seed that is still immature at harvest additional time to ripen.
Be sure to allow for enough airflow as the crop cures. Depending on your scale and type of crop, this may entail such things as placing your seed pods in a shallow container and stirring them daily, hanging plants or seed heads upside down from the ceiling, or making sure the piles of plants in the field are no more than a foot or two deep and turning the piles regularly to expose interior plants to the air. For medium- to large-scale harvests, plants are commonly laid in rows in the field (referred to as windrows) for drying. Plants in windrows can be laid on tarps, Reemay, bedsheets, insect netting, or geotextile fabric to catch dropping seed. Facing the heads of your plants toward the center and roots toward the edge of the fabric is best. This allows you to catch the seed while keeping roots off the drop cloth to avoid contaminating your seed with soil. Geotextile fabric, commonly used in landscaping as a weed barrier, works well because it allows water to pass through and wicks moisture away from the plant material. However, plant material sticks to it easily and makes it difficult to re-use. Reemay also allows water to pass, but can easily tear. Some types of insect netting work well, but there is a range in strength; some insect netting tears easily while others are very sturdy. Tarps are sturdy, but moisture may pool, even from morning dew. Bedsheets work well on a small scale. Geotextile fabric or Reemay can also be placed over a windrow to protect it from light rain when precipitation is expected. Plants in a windrow should be turned frequently to ensure even drying throughout the pile. Refer to the three elements (color, dryness, ease of detachment) that indicate dry-seeded crop maturity to help you gauge when your seed is sufficiently dry for processing.
How to process seed
When your crop is dry enough, you can separate the seed from the non-seed material that it is mixed with. This non-seed material may include leaves, stems, and pods from the seed crop (called chaff), as well as dirt, stones, and weed seeds. The first step in this process is to thresh the crop. Next, depending on how important it is to keep non-seed material out of the seed, the crop is usually cleaned through cycles of winnowing and screening. Often, between threshing and cleaning, or between cycles of winnowing and screening, the seed is given time to dry further. Generally, the drier the seed, the easier it will be to clean.
Threshing
To thresh is to loosen or release the seeds from the rest of the plant material that is attached to the seed. This step facilitates the subsequent separation of the seed from non-seed material in seed cleaning. More mature seed will release from its pod more easily than immature seed. Overthreshing will introduce more chaff and immature seed into the seed that you will be cleaning. There are many different threshing techniques, and the best technique for you will depend on your crop and the scale of your seed-saving endeavor. Some popular methods of threshing include:
- Rubbing by hand. Rub seed pods between your gloved hands to break them open or rub the seed and chaff over a rough surface.
- Stomping or “dancing” on top of the seed and chaff. Lay the seed and chaff on a tarp or in a large bucket. Make sure your shoes don’t have dirt or any other seed on them, and wiggle your feet from side to side on top of the seeds, allowing the ball of your foot to swivel from left to right, as if you were squishing a bug. This works best wearing smooth-soled boots, so the seed does not stick to the tread on your sole or fall into your shoe at your ankle. To protect your seed from damage, always make sure you have several inches of seeds and chaff between your foot and the bottom of the bucket or the ground while crushing.
- Shaking the seed heads into a trash can. Hit the seed stalks vigorously on the inside walls of a trash can. This helps you avoid accidentally getting dirt or other seed in your crop and makes you less likely to overthresh your material.
- Driving a vehicle over the seed and chaff. Lay the seed and what it’s attached to on a tarp. Place another tarp on top of the seed, and secure it in place. Now drive back and forth and side to side on the tarp. This should only be done with hard seed that doesn’t crack or break easily.
- Using a variety of machines. Larger-scale seed growers often use commercial threshing machines (belt threshers or combines), or mulching equipment that is specially adapted to serve as a threshing machine.
Most of the threshing methods listed above subject the seed to a significant amount of pressure, and each crop varies in sensitivity to pressure. Some delicate seed crops, such as broccoli, peas, and cilantro, will be damaged if stomped on or driven over. Others, such as beets, radish, and spinach, can easily withstand such pressure. In addition, while seed needs to be sufficiently dry before threshing, seed that is too dry is more subject to crack under pressure. To be safe, try any threshing method on a small lot of seed before attempting it on your entire seed lot. Sometimes you can reduce the chances of damaging seed by threshing it on a softer surface or for a shorter amount of time. While threshing, check seeds often to see if they have received sufficient pressure to break free from the material they were attached to or if they are cracking from too much pressure.
Depending on the relative quantity and type of material that the seed is mixed with, some garden-scale seed growers may find that they need to go no further after they have threshed their crop. They may have no problems using seed that is mixed with chaff. In most cases, however, seed growers will want to separate the seed from the sticks, leaves, dirt, stones, and weed seeds, which is important for long-term storage. If so, the next step is cleaning.
Cleaning
Cleaning is generally accomplished using a combination of two methods: winnowing (separation based on weight) and screening (separation based on size).
Winnowing
To winnow is to use an air current to separate seed from non-seed material based on weight. In winnowing, seed and non-seed materials are poured in front of a wind source (either natural wind or a fan). The heavier materials fall closer to the wind source while lighter materials are carried further from the wind source.
One typical winnowing setup includes two plastic bins arranged in front of a box fan. The fan and bins are on a tarp to catch any stray seed. When the seed and non-seed materials are poured in front of the fan, the heaviest seed will land in the first bin and lighter seed will land in the second bin. Much (but not all) of the non-seed material will be lighter than the lightest seed, and will land somewhere past the second bin. It takes practice to determine the correct fan speed, the distance the bins should be from the fan, and the speed with which to pour the seed in front of the fan.
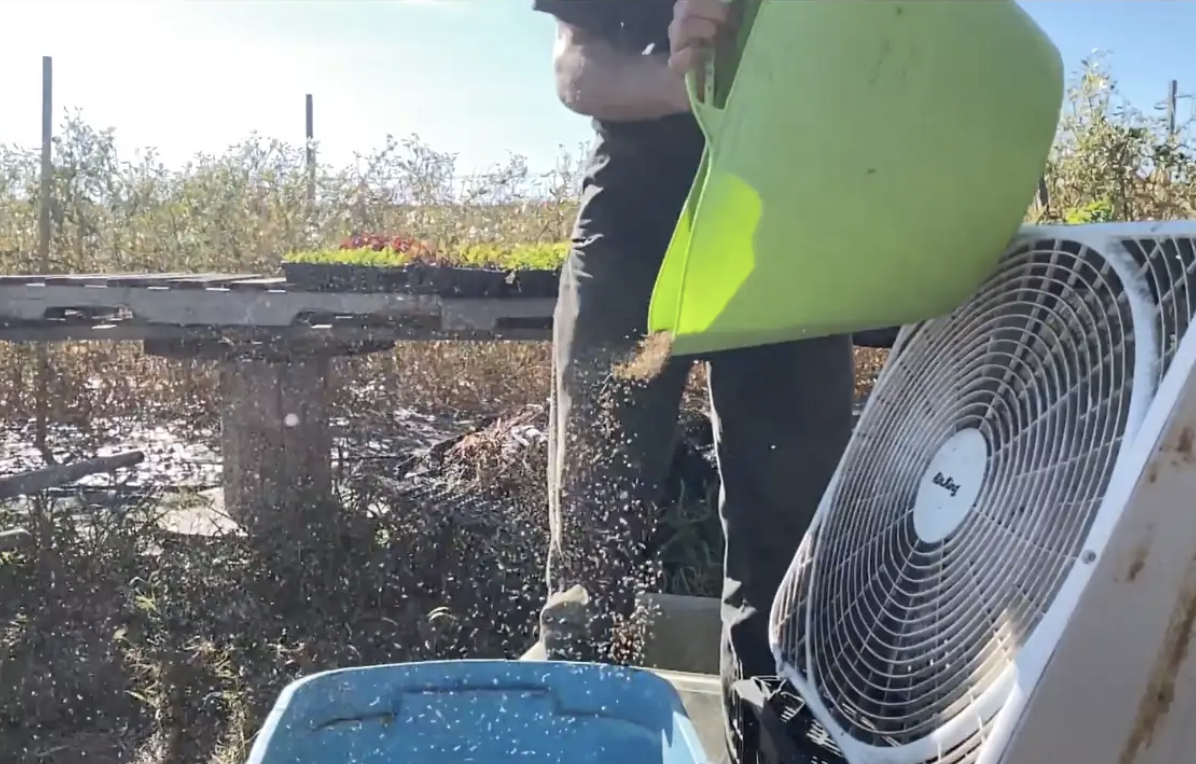
Another typical winnowing setup includes standing on a tarp and pouring seed from one stainless steel bowl to another. Light chaff will float away from the bowl receiving the seed. Some use a wind source like a fan or a hair dryer (with no heat) to further encourage chaff to float away as seed falls from bowl to bowl. It takes practice to determine the correct amount of seed to put in the bowl and the best distance of the wind source from the bowl. For winnowing large seed lots, farmers and seed professionals often use seed cleaning equipment like a gravity table or Winnow Wizard (see our Seed Cleaning Equipment List for more details). It is best to use a dust mask when winnowing to keep chaff and dust out of your lungs.
Screening
Screening is the use of metal trays or seed screens with holes to separate seed from non-seed material based on size. One basic screening technique involves using two stacked screens. The top screen should have holes slightly larger than the seed, and the bottom screen should have holes slightly smaller than the seed. Pour seed and chaff in a thin layer on the screen with the larger holes. Shake and/or gently rub until the seed and any smaller materials have passed through. All material larger than the seed will remain on top and can now be discarded. Next, shake and/or gently rub the remaining seed and chaff on the screen with the smaller holes until all material smaller than the seed has passed through. The majority of what remains on top of this screen will be good seed.
You can buy screens specifically designed for seed cleaning, or you can make them yourself. The screens specifically designed for seed cleaning are categorized (by hole width) in increments of 64ths of an inch. For example, a #6 screen has openings that are 6/64” in width. Most screens have round holes, but some screens made for particular crops have holes of different shapes. For example, there are screens with oblong holes that permit lettuce seed to pass through while retaining larger and differently shaped materials on top. The most commonly available seed screens are nestable and are mounted on 12″ square wooden frames. Check out our Seed Cleaning Equipment List for seed cleaning screen suppliers. Seed of different varieties of the same crop and seed of the same variety grown in different years or locations will vary in size. The following are estimates of screen sizes for common vegetable seeds of varied sizes.
Screen Sizes for various crops
| Seed Size | Crop Examples | Range of Commonly used Screen Sizes |
| tiny | basil, mint, amaranth, many herbs | 1/20th to 4 |
| small | Brassicas (broccoli family), celery, chicory | 5 to 7 |
| medium | beets, chard, carrot, parsnip, filet beans | 7 to 12 |
| large | Cucurbitaceae (cucumber and squash family), common beans and pole beans | 12 to 20 (pill shape, ¾” long for beans) |
Because commercial seed screens are relatively expensive, you may decide to make your own screens using materials such as hardware cloth, window screens, and wire mesh.
¼”, ½”, and 3/8” hardware cloth are useful for screening medium to large seeds and for removing large pieces of chaff. 1/8” hardware cloth is useful for medium seeds and some smaller seeds. You may find pieces of old kitchen or electronics equipment at scrap yards and thrift stores that have perfectly sized screens for your seeds.
For screening large seed lots, farmers and seed professionals most commonly use machines called Clippers. Several suppliers for clippers are listed in our Seed Cleaning Equipment List.
How to dry seed using ambient conditions
Dry the cleaned seed in thin layers (around 1/4″ inch thick) on plywood, window screen, sheet pans, or any hard, non-stick surface. Stirring seed helps ensure even drying. Placing fans near seeds will also facilitate drying.
Seeds can become damaged when the ambient temperature rises above 95°F (35°C), and dark-colored seeds can become overheated when exposed to direct sunlight, especially at temperatures at or above 80°F (27°C). Therefore, take care to dry your seed in a location that is warm, but not too warm, and dry them out of the sun if necessary.
Wet-Seeded Crops
Fewer generalizations can be made about when or how to harvest and process wet-seeded crops. Specific Crops: Seed Saving Tips shares guidelines on major wet-seeded crops. There are, however, a few generalizations that can be made.
When to harvest and when to extract seed
In general, let your wet-seeded crop mature on the vine as long as possible before harvest; the seeds will continue to increase in size and quality for days to weeks after the fruit is ripe enough to eat. Cucumbers and Zucchini are left on the vine much longer than if harvested for eating and will get much bigger and usually change color when ripe. For many types of winter squash, seed quality and germination percentage will increase if the seed is left in the fruit for 2 to 3 months. In some cases with wet-seeded crops, you may need to harvest the fruit to protect it against damage and disease before all of its seeds are fully mature and let the seed continue to ripen in storage before extracting them from the fruit.
How to process seed
For every wet-seeded crop, there are several viable options for seed extraction and processing. Most of the options involve one or more of the following methods: harvest, soaking, fermentation, rinsing, and decanting. The right option for you will depend on your scale, the equipment you have on hand, your time constraints, and your desired level of seed quality. Continue to Specific Crops: Seed Saving Tips for crop-specific seed extraction and processing suggestions and experiment to see which option works best for you.
Harvest
Once the fully ripe fruits are harvested, either cut each fruit open and scoop out the seed cavity, or smash the whole fruit in a bucket.
Soaking
Soaking can make seed cleaning easier by loosening the pulpy residue clinging to the seed. Place seeds and pulp in a container full of water. Allow seeds to soak until the pulp seems easier to separate from the seed, no longer than 8-12 hours.
Fermentation
Fermentation also makes seed cleaning easier by loosening the pulpy residue clinging to the seed. In addition, it removes a germination-inhibiting gel from the seed and destroys some diseases. There is much disagreement among seed experts on which seeds need to be fermented and which seeds are damaged by fermentation. The only two crops that virtually all experts generally agree should be fermented are tomatoes and cucumbers. Therefore, we recommend fermentation only for these crops. To ferment:
- Place seeds and pulp in a container. Add water to the seed/pulp mixture only if the mash is too thick to stir.
- Place the container in a warm location, ideally between 72-86°F (22-30°C). Depending on temperature and seed variety, the fermentation process can take anywhere from 48 to 72 hours.
- Stir the fermenting mixture two or three times a day to aerate it and facilitate even fermentation. A small amount of white mold may appear on top of the mash; it is not harmful and can be stirred back in.
- Closely monitor the seed for sprouting. Although damage may begin earlier, sprouting is a sure sign that the seed has soaked too long, and that damage has occurred. Experts disagree on the best method to determine when fermentation is complete. Some consider the process finished when the mixture stops bubbling. Others say the process stops when a thick layer of white mold completely covers the surface of the mixture. Still others test for doneness by regularly removing a sample of the fermenting seeds, rinsing them in a strainer, and feeling them. If the gel around the seeds is completely gone, they consider the process finished. People have had success using all of these methods. Experiment to find the method that works best for you.
- When fermentation is complete, decant and rinse.
Rinsing
The process of rinsing separates pulp from seed. The basic elements necessary for screening are:
- A piece of metal with small holes in it, such as a colander, strainer, or screen,
- Pressurized water
- Hands for rubbing.
Rinsing setups can vary according to your scale and how thorough the rinse needs to be. Below are two common methods:
- Place seeds and pulp in a strainer. Put the strainer under running water. Rub and rinse until the seeds are clean.
- Use two framed screens, one on top of the other. The top screen should have holes just large enough to allow the seeds to fall through while retaining large pieces of pulp on top. The screen below should have holes just small enough to retain the seeds on top while allowing small pieces of pulp to fall through. Place seeds and whatever they are attached to on the top screen, and break up the material by rubbing it and spraying it with water. Once the majority of the seeds have fallen through the first screen, remove this screen and spray and rub the material on the bottom screen until only seed remains.
One drawback to relying solely on rinsing for cleaning your seed is that it does not remove lightweight, non-viable seed. To do that, you will need to use a decanting process.
Decanting
The process of decanting separates pulp and lightweight, less viable seed from good heavy seed. To decant:
- Place seeds and pulp in a container that can hold at least 10 times the volume of your seeds and pulp. If necessary, break up the seed/pulp mixture by crushing and stirring.
- Add water to your seeds and pulp. A good general guideline is to have about 1 part seeds and pulp to 4 parts water. If necessary, agitate until the seed is loosened from the pulp.
- Wait a few minutes for the good, heavy seed to settle on the bottom. With some crops, good seed can become stuck to air bubbles and remain floating on top. In these cases, gently push the seeds down with your hands.
- Pour the top layer of pulp, debris, and lighter, less viable seed off the top. Repeat steps 2 through 4 about 3 to 6 times until the water is fairly clear.
- Pour seed into a strainer or onto a screen and rinse.
Note: For some crops, some seed growers do a quick rinse, then decant their seeds. In some cases, rinsing first can remove much of the pulp before decanting, requiring fewer repetitions of the decanting process.
Large-scale wet-seeded crop processing
Large-scale growers often harvest and process wet-seeded crops in one mechanical operation where fruit is picked from the row, conveyed to a crushing mechanism, and the pulp is removed from the seed by washing with water in a rotating drum.
How to dry seeds at ambient conditions
To reduce the risk of seeds becoming diseased, dry your seeds as quickly as possible. To do this, maximize airflow. Spread the seed out in a very thin layer (about ¼ inch thick) onto a screen, plywood, sheet pans, or any hard, non-stick surface. Avoid using paper towels, newspaper, cardboard, or cloth because wet seeds will tend to stick to the surface, making them difficult to remove. If the seed is very wet, repeated stirring (every fifteen minutes for the first few hours, less often thereafter) will encourage quick drying and further reduce any chances of sticking. Air conditioning (especially in hot, humid environments) and fans can also be useful. Remember that seeds should not reach temperatures over 95°F (35°C).
Seed Storage: How to protect your seed harvest and keep it viable
To maximize the life of your seed, keep it cool and dry, and protect it from insects and rodents. Seed needs to be kept cool and dry because inside every seed is a plant embryo living on the seed’s food stores, the endosperm; when the embryo uses up all of the food stored in the endosperm, it dies, and the seed will not germinate. To prolong the life of a seed, you must slow down the rate at which the embryo uses its food. You can do this by keeping the seed cool and dry. Another reason to keep your seed cool and dry is that cool, dry seed is less vulnerable to attack from bacteria, fungi, and some insects.
Seed can be an excellent source of nourishment for rodents and many insects. Therefore, where insects and rodents are a concern, you will need to protect your seeds by storing them in thick plastic, glass, or metal. But before you can safely store your seed in plastic, glass, or metal, you will need to make sure that your seed is “very dry,” which we will describe next.
Determining if your seed is “very dry”
An important principle in seed storage is that the more a storage container or location restricts the release of moisture, the drier your seeds will need to be. To be on the safe side, we recommend drying seed to a level that we call “very dry” before storing in any container that restricts the release of moisture. Seed is “very dry” when it passes one or more of the following three tests:
Brittleness test
Test small, oblong seeds, or thin ones (such as squash) by bending them. If they are “very dry,” they will snap instead of just bending. With bigger seeds such as corn, beans, or peas, put seeds on a hard surface and hit them with a hammer. If they are “very dry,” they will shatter like glass when hit. If seeds are inadequately dry, they will smash or mush instead of shattering.
Envelope test
Put an envelope (or some other paper item) in your lot of seed overnight. The next morning, compare the envelope left with the seed to an envelope that was not with the seed. Does it seem moister than the envelope not left with the seed? Is it more malleable, or is it as crisp as the other envelope? If the envelope left with the seed seems as dry as or drier than the envelope left at ambient conditions, then you can consider the seed to be “very dry.” This test works best where paper tends to stay crisp and dry at ambient conditions.
Test of percent moisture
The most accurate test for dryness is to determine the percent moisture content of your seed. To determine the percent moisture content, record the weight of a sample of your seed. Next, place this sample of seed in an oven or toaster oven and dry it slowly on low heat (taking care not to burn it) until all moisture is removed. Weigh the seed several times during drying to determine whether all moisture has been removed and the weight has reached equilibrium. Record the weight of your completely dry seed and then use the following formula:
Seed moisture content (%) = ((fresh seed weight – dry seed weight)/wet seed weight) x 100
A general guideline is that small seeds are “very dry” and ready to be stored in containers that restrict moisture release at approximately 5% seed moisture. Large seeds are ready at 7% seed moisture.
Getting your seed to “very dry”
With some exceptions for hot, dry climates, seed dried at ambient conditions usually will not be “very dry.” If you discover that your seed dried at ambient conditions is still not “very dry,” and you wish to store it in a container that restricts moisture release, there are a couple of options for further drying your seed:
Using silica gel
Determine the weight of the seed to be dried, including the packet that will hold the seed in the drying container. Measure out an equal weight of silica gel and place the packet of seed and silica gel in an airtight container. The container size should be small in relation to the volume of seeds being dried. Depending on the original moisture content and size of your seeds, they should remain in the drying container for 2-7 days. Use the tests described above to determine when the seed is “very dry.” Check daily for dryness, because seed left with silica gel too long may lose too much moisture and become damaged or go dormant. Small seeds should not be dried below 3% moisture, and large seeds should not be dried below 5% moisture. When the seed is “very dry,” remove the packet of seed from the drying container and transfer it to another airtight container.
Using a food dehydrator
Use a food dehydrator with temperature controls that go down to 85°F (29°C). Set the dehydrator at 85°F (29°C) and check your seed often to avoid over-drying. The time it takes for your seed to dry will depend on your crop and your dehydrator, so experiment with small batches of seed before drying your entire seed lot.
Where to store your seeds
The right storage method for you will depend on the quantity of your seed, your intended length of storage, ambient conditions, and presence of pests. It will also depend on the type of seed you are storing. Some seeds, like amaranth, can retain good germination and vigor after 40 years in storage and are famously long-lived. You have more leeway in choosing how to store long-lived seeds. Other seeds are famously short-lived. The three major crops with very short-lived seeds are onions, leeks, and parsnips, which may retain good germination and vigor for only one to two years. It is especially important to keep short-lived seeds very cool and dry.
For most major vegetable crops, if the seed is of good quality (not small or diseased) and storage conditions are good, you can expect it to retain good germination and vigor for 3-5 years. So, except for the short-lived seeds listed above, you can plan to store most of your seeds for 3-5 years before you grow them out again. In many cases, however, seed will still germinate and grow after more than 5 years in storage. In fact, it is not unheard of for high-quality seed of some common vegetable crops to remain viable for more than 10 years. Seed stored for this long, however, will likely have a lower germination rate and lower vigor.
Storage containers and locations
Two basic elements to consider when choosing a storage container are the level of moisture release it allows (and hence whether it requires you to get your seed “very dry”) and the level of protection from insects and rodents it provides. Here is how common seed storage containers and locations compare on these two elements:
- Paper or cloth – Allows for moisture release, so seeds don’t have to be “very dry,” though they need to be very close to this ideal dry state. Not protective against insects and rodents.
- Plastic bags – Largely restricts moisture release, so seed should be “very dry”. Not protective against insects and rodents.
- Plastic tubs, bins, buckets – Somewhat restricts moisture release, so seed should be “very dry”. Somewhat protective against insects and rodents.
- Glass jars, other air-tight containers – Greatly restricts moisture release, so seed must be “very dry”. More protective against insects and rodents.
- On display – Storing your seeds in glass jars in a place of prominence in your house allows you to enjoy their beauty fully, but ambient conditions may not be ideal for seed longevity.
- Refrigerator – Protects against insects and rodents. Good for medium-term storage of seeds. A refrigerator may not provide the ideal level of humidity, so seeds should be in an airtight container and must be “very dry.” If seeds are taken from the refrigerator and transferred to room temperature, prevent condensation on the seeds by allowing them to reach room temperature before opening the container.
- Freezer – Protects against insects and rodents. Kills insects. Good for long-term storage of seeds. A freezer is so cold and dry that moist, unprotected seed will be damaged. Seed should be in an airtight container and must be “very dry.” If seeds are taken from frozen storage and transferred to room temperature, prevent condensation on the seeds by allowing them to reach room temperature before opening the container.
- In the coolest, driest place in the house – Good for short- to medium-term storage of seeds. Not necessary to get seeds to “very dry.”
To determine whether a location is cool and dry enough to store seed, you can use this general guideline: The sum of the storage temperature (in °F), plus the relative humidity (in percent) should not exceed 100. The formula looks like this:
Temperature °F + Relative Humidity % = <100.
What to do when your seed lot is infested with insects
Insects such as mites, weevils, beetles, and moths can be present in your seed at harvest, and they can find your seed in storage. If you have cause to believe that your seed is infested, you can kill the pests by putting your seed in the freezer for a few days. Your seed must be “very dry” before you put it in the freezer, and it should be in an airtight container. If you don’t plan on leaving your seeds in the freezer after the insects are killed, remember that you will need to prevent condensation on the seeds by allowing them to reach room temperature before opening the container.
Temperature and humidity fluctuations
Temperature and humidity fluctuations are detrimental to seed longevity, so to maximize the life of your seed, store them at a constant temperature and humidity. If you are storing your seed in the refrigerator or freezer, minimize the number of times that you remove the seed from these locations.
Labeling
Make sure to label your seed. Include on your label the type of plant, the variety name, the name of the seed’s original source, and the year the seeds were last grown. You can also include information gathered about the crop throughout the growing season such as days to maturity (number of days from sowing to mature seed); plant height and habit; fruit size, color, and shape; productivity; disease resistances or susceptibilities; flavor; population size; and storage qualities. To be on the safe side, many seed savers put labels both on the inside and the outside of their storage containers.
Saving remnant seed
Make sure to hold some seed in reserve whenever you plant a variety you are maintaining. By holding a remnant seed sample, then if there is a crop failure of that variety, you will still have some seed in storage to try again next year.
Germination: Understand your seed’s germination rate
If you have old seeds or are curious about the quality of seeds that you grew and saved, you can use one of the following tests to determine the germination rate of your seed.
In-soil germination test
The best way to test the germination rate of your seed lot is to sow a selection of seeds in a flat of soil as you would if you were starting them in a greenhouse. The only major difference between sowing seeds for starts and sowing seeds for a germination test is that you may sow seeds for a germination test more closely together (around ½ inch apart is fine). Adapt the directions below for germination testing done in paper rolls to your in-soil germination test.
Paper roll test
If you find that the in-soil germination test is not practical to test your seeds in soil, use the paper roll test:
Materials needed:
- Germination paper or paper towels.
- If possible, we recommend using germination paper because it is acid-free; acid in paper towels can affect germination. It also has an ideal texture for retaining moisture without becoming soggy or waterlogged. Germination paper is not easy to come by in small quantities, so you may want to go in on a supply with your gardening friends.
- Plastic bags or dinner plates
- Permanent marker
- Notebook for recording information
Procedure:
- Moisten germination paper. The paper should be wet but not dripping. You can use a spray bottle to moisten the paper, or you can quickly dip the paper into a tray of clean water. If water beads up around your fingertip when you press on the paper, it is too wet.
- Choose a random selection of seeds from the seed lot you are testing. Do not select all the best (or worst) looking seeds or your results will be skewed. Additionally, the more seeds that you can spare to do the test, the more accurate your results will be. Ten seeds is an absolute minimum. Testing 50 – 100 seeds will give you more dependable results.
- Place seeds to be tested somewhat equidistant from each other, usually not closer than 1/2”, on the damp paper. If seeds fit easily on half of the paper, then fold the other half of the paper over the seeds. If the seeds take up the whole paper, put another damp paper on top of the seeds. Roll the paper up somewhat tightly to keep the seeds from shifting position or falling out.
- Seeds need both air and moisture to germinate. You need to strike a balance between keeping moisture in and allowing the seeds to breathe. There are four ways to do this: you can place the seed roll a) between two dinner plates closed together, b) in a plastic bag that is sealed all the way but has some air in it, c) in a plastic bag that is sealed all the way but has holes in it, d) in a plastic bag that is closed only partially.
- Using the permanent marker, write the variety name of the seed, the date you started the test, and the number of seeds onto the bag (or tape the info to the plate). Also write this information into your notebook.
- Try to approximate the conditions that your seed prefers for germination. Some seeds, like spinach, celery, and peas, germinate best at lower temperatures (60-70°F/15-21°C), while eggplants, melons, and peppers prefer more warmth (72-80°F/22-27 °C). Most vegetable seeds are indifferent to the amount of light they receive during germination, but some (such as lettuce and celery) prefer light. In contrast, others (such as onions and chives) prefer darkness. You can learn your crop’s preferred germination conditions from many gardening books, gardening websites, or seed catalogs.
- After 3 days, start checking the seeds daily. The fresh air that wafts in when you check on the seeds will do them good, and you can add moisture if the paper is drying out. Most importantly, check the progress of your germinating seeds. If a seed molds or looks rotten, count it as dead and remove it. If it looks like a seed’s first root has fully emerged, count it as germinated and remove it. Removing dead and germinated seeds from the paper roll keeps things from getting moldy. In your notebook, keep a running count (with dates) of the dead and germinated seeds.
- Continue to check your seeds daily until: a) all of your seeds have germinated or b) the maximum predicted germination time for your crop has passed. Some seeds take no more than 2 days to germinate, while others take as long as 20 days. A good general rule is to continue the test for at least 21 days. Then, from your running count, find the total number of good seeds. If all of the seeds germinated, then you have a perfect germination rate – 100%. If it was less than perfect, divide the number of seeds that germinated by the number you started with to determine the germination rate. For example, if you started with ten seeds and only nine germinated, then 9/10 = 0.9 or 90%.
How to use the results of your germination test
First, the germination rate helps you to know how much seed to sow. For example, if the germination rate is 50%, sow twice as much seed to get a full stand.
Second, the germination rate tells you about the fitness of your seeds. In general, as the germination rate goes down, so does your seed lot’s general vigor and vitality. Low germination rates are a warning that the energy reserves stored in your seed are running very low, and that they may produce plants that underperform in the field.
A note about dormancy
Most seeds of wild plants go through a period of dormancy, which is a mechanism for delaying germination until the seed is dispersed and exposed to favorable growing conditions. In general, as our food crops became domesticated, their seed dormancy characteristics were lessened or eliminated through selection for early germination by farmers. Nevertheless, the seeds of some of our common crops still exhibit some dormancy. For example, spinach, lettuce, and pepper seeds may not germinate well for a few months after they are first harvested.
A period of dry storage is usually all that is required before dormant seeds will germinate. In some cases, such as with several herbs, the seed coat must be scratched, notched, or otherwise worn down before the seed can germinate.
In general, since dormancy is usually broken over time and seed usually sits in storage through the winter, you may never need to worry about the seed dormancy characteristics of your crop. If, however, you wanted to test the germination rate of a lot of freshly harvested seed, do not be surprised to discover that the seed tested doesn’t germinate in the fall. Rather than assuming that your seed is dead and needs to be discarded, let the seed sit in storage for a few months, then try testing it again.
Specific Crops: Seed saving tips for common vegetable crops
Beets (Chenopodiaceae): Beta vulgaris
Growing tips: Beets are a cool-season crop and are best grown in areas with mild temperatures (below 75-80°F/23-26°C) during flowering. Beets are biennial and require vernalization to flower. The ideal size of the root for overwintering (in terms of cold hardiness) is 1-1.5 in diameter. The flower stalk is extremely large; up to 5ft tall.
Harvest and processing tips: Beet seed crops from second-year roots mature in approximately 140 – 160 days depending on variety, climate, and planting date. Beet seed formation usually starts anywhere from six to ten weeks after flower stalk initiation. As the flowering habit is indeterminate, flowering and subsequent seed maturation will continue until harvest or frost. Because beet seed matures sequentially, the percentage of beet seed reaching full maturity at the time of harvest will usually not exceed 75% of the total seed crop. The earliest seed to set will often mature several weeks before the bulk of the seed on any given plant has matured. This first seed set is usually of a high quality and has a high germination rate, but it may readily shatter as the bulk of the crop is maturing. The seed grower must determine when maximum overall maturation has occurred, without losing a significant amount of the earliest-maturing seed. For example, cool, wet weather can often occur during the late-season seed maturation period for beets in the Pacific Northwest, making it even more important for growers to closely monitor the seed maturity and not harvest too early or too late. Early harvest may result in a percentage of seed that is not fully mature. Harvesting seed past the optimum time period may result in reduced yield and seed quality due to seed shattering and an increased incidence of seed-borne diseases.
A standard method used to judge maturity of the beet seed crop is a visual assessment of the color of the seed ball (a multiple-seeded fruit resulting from the fused dry corky bracts of two or more flowers that occur at the same node). Harvest should occur when between 60 and 80% of the seed balls on at least 90% of the plants in the field have turned a tannish brown shade, typical of mature beet seed. Unfortunately, this method may sometimes be inaccurate due to environmental effects or the genetic variation of the particular beet variety being produced. In some environments, the beet seed balls will turn a darker shade of brown, sometimes before they reach full maturity. This often occurs with higher-than-usual levels of precipitation during the final weeks of seed maturation. This darkening may be due to saprophytic bacterial or fungal growth on the corky bract tissue of the seed balls. Depending on the pathogen, it may not be harmful to the seed, but it seriously impedes visual assessment of beet seed maturity. There is also considerable variation between varieties in the degree of browning that occurs during the maturation process. Some beet varieties may retain greener hues than others, even when fully mature.
To make a more accurate assessment of seed maturity, it is best to check the relative maturity of the seed endosperm. The endosperm, which grows concurrently with the embryo, must be fully developed to produce viable, fully mature seed that will grow vigorously and maintain a high germination percentage through its expected storage life. The starchy endosperm can be monitored during maturation by cracking open any one of the several seeds within each beet seed ball. The best way to determine the maturity is to squeeze a small amount of the endosperm out of the cracked seed and visually inspect it. If the endosperm is viscous and appears translucent or milky, it is not close to maturity and will require at least 3 to 4 weeks to mature. After this, the endosperm will start to appear grayish and waxy, which is often called “flinty,” but it is still not close to maturity. When the endosperm becomes “starchy,” with a true solid white color and a firm texture, then the seed is very close to maturity. A majority of the seed, at least 70 to 75% of the seeds on any given plant, must be at this advanced starchy stage before considering harvest. Avoid threshing beets when the plants are too dry, as stems will break into pieces that are difficult to clean out of the seed crop.
Broccoli/Cauliflower (Brassicaceae): Brassica oleracea
Growing tips: Broccoli is commonly grown as an annual; when grown for seed, it does not require vernalization, though its ancestors followed a biennial cycle. Cauliflower is a true biennial and requires vernalization. Both broccoli and cauliflower benefit from staking in the field.
Harvest and processing tips: Harvest and processing for broccoli and cauliflower should follow steps outlined in the cabbage description.
Cabbage (Brassicaceae): Brassica oleracea
Growing tips: Cabbage is a biennial and requires vernalization to induce flowering. The ideal size for overwintering (in terms of cold hardiness) is a fully grown, but loosely formed head, before the head firms up. Cabbage plants will generally overwinter in areas that don’t drop below 20°F (-7°C) in the winter. In colder winter climates, cabbage plants must be dug up and stored over the winter. Choose the firmest heads and trim off loose leaves. Dig up the entire plant and clip the roots to 12 inches, leaving some lateral roots. Cover the cabbage heads with damp sawdust. Heads may also be wrapped in damp newspaper and stored for 2-4 months at 32-40°F (0-4°C) and 80-90% relative humidity. In the spring of the second year, after re-planting or overwintering in the field, it may help to cut a shallow X on the top of the cabbage head to promote the seed stalk to emerge. The seed stalk will grow 3-4 feet tall and produce seedpods.
Harvest and processing tips: In Year 2, pods will start to dry and turn brown as they mature. If the seed pods are allowed to dry completely in the field, you risk them shattering. It is best to harvest the mature plants and allow them to dry completely on sheets or tarps. Cut plants at the base and windrow (onto tarps) for 3-5 days during dry weather. Dry plants need to be threshed before cleaning. Thresh plants by stripping pods and gently rubbing to crush pods and release seeds, or by hitting the plants with a rake or hoe, stomping on them, or hitting the plants against the inside of a trash can. Brassica seeds can be crushed or damaged by too vigorous rubbing. The best seeds will thresh easily from the plant. Threshed pods can be cleaned by winnowing and/or cleaning with screens. When cleaning seed with screens, two screens are commonly used: a top screen to scalp off large debris and a smaller bottom screen to retain seed and allow small debris to pass. A size 7 or 8 screen should allow seed to pass through and retain larger debris. A size 3 screen, a small slotted screen, or wire mesh may be used to retain seed and allow smaller debris to pass through.
Carrot (Apiaceae): Daucus carota
Growing tips: Carrots are a biennial and require vernalization to flower (minimum of 6 weeks vernalization for most varieties). The ideal size for overwintering (in terms of cold hardiness) is slightly smaller than the size you would harvest for food. It should be about 3/4-1in wide at the crown (see section on biennial crops). However, this size is a little small for selection of roots for tip fill and overall shape. If making selections, grow roots to a slightly larger size, dig roots, make selections, and store the roots in plastic bags with cedar shavings in a cooler through the winter. Plant roots out as early as possible. Carrots benefit from staking in the field. Carrots will cross with Queen Anne’s Lace.
Harvest and processing tips: Carrot seed crops usually mature from mid-August to mid-September in the Western Region. The king or primary umbel is the first to ripen. The seed will turn from dark green to brown and will begin to detach from the umbel, but because of the racemes, or little hooks that cover the seed, it often latches together and remains on the umbel surface. Much of this seed can still be lost to shattering. The secondary and tertiary umbels that form after the king umbel will ripen anywhere from a few days to a few weeks later. However, waiting until all of the late-forming umbels ripen is seldom economically viable, as this seed tends to be of lower quality and strong winds will begin to dislodge the seed from the king umbels, which is generally the best seed.
Poor soil fertility, uneven soil moisture, excessive heat at flowering, inadequate pollination, and Lygus bug (Lygus spp.) damage can affect embryo development. Good quality carrot seed is generally plump and heavy. One way to check initial seed quality is to rub a small sample in the palm of your hand using a fair bit of pressure. Good seed will remain intact while poor seed will crush and break apart. When about 80% of the total seed has turned brown and detached from the umbel, the crop is usually swathed and left to lie in the field for 2-5 days to allow the stems to dry so that the crop can be easily threshed. The crop is very vulnerable to shattering due to high winds and rain at this stage, so timing and weather awareness are important.
Proper threshing takes an experienced operator. Because carrot seed is light in comparison to the stems and other trash created by threshing with a combine, it’s difficult to get a clean seed crop using a combine. Further seed cleaning with screens and forced air is necessary to get a clean seed crop. It’s not uncommon for the total weight that comes out of the combine to be less than 50% good, clean seed. Research and trials show that early harvest of carrot seed before the seed is physiologically ripe results in lower seed quality.
Harvest beyond mid-September in the Western Region is dangerous as it exposes the crop to the vagaries of wind and rain damage. If the crop is small and cover is available, cut the crop at the proper stage and then move it onto paper or plastic under cover until it can be threshed. The stems will still have a fair bit of moisture, so make sure to turn the crop manually to get it uniformly dry. Don’t pile the crop any higher than 2-3 ft (61-91 cm) deep, and try to keep the pile loose and fluffy to allow airflow through the crop. Supplementary air from fans may be necessary to keep mold from forming on the mature seed until threshing.
Common Bean (Fabaceae): Phaseolus vulgaris
Growing tips: Bean seed crops may require a long season to mature (average 90-120 days) and must be planted early enough to mature and dry before frosts or rains. Dry, long growing seasons are key to minimizing disease pressure. Temperatures above 90°F (32 °C) or below 50°F (10°C) during flowering may adversely affect pod set and seed yields. Most bean varieties germinate best when soil temperatures are at or above 65°F (12°C), but germination may be inhibited at temperatures above 95°F (35 °C). There are, however, instances when seed growers must plant with soil temperatures below optimum to fully mature a seed crop by the end of the season. Depending on your climate, beans can be day-length sensitive, which means the flowers will not open until the days are shorter. Always test the variety before relying on a seed crop.
Harvest and processing tips: Each variety has its own specific harvest timing, and while this makes overall recommendations for gauging cutting, curing, and threshing difficult, there are basic signs that indicate maturity. Most bean varieties will be mature for harvesting when they first turn yellow, tan, or mahogany. If the bean has turned too dark a brown, it is at risk for seed shattering during harvest. The crop should be cut when approximately 70 to 80% of the pods of the plant are the desired color and point of breaking.
Corn (Poaceae): Zea mays
Growing tips: Corn is highly susceptible to inbreeding depression, so maintaining a large enough population is essential (see Crop-Specific Chart). A good seed set requires adequate pollen application to the silks (style and stigma). For this reason, corn benefits from planting in a block rather than long, narrow rows.
Harvest and processing tips: Corn is harvested when the husk has dried completely on the stalks. Once ears are dry, you can rub two cobs together to free the seed kernels from the cob or rub the ears against a ¼” screen. Hand shellers, crank shellers, and other machinery can be used for larger productions. Winnow out any other debris from the seeds.
Cucumber (Cucurbitaceae): Cucumis sativus
Harvest and processing tips: Cucumber seeds are still very immature when the fruit is edible. Leave edible cucumbers on the vine for around 4-5 weeks. For harvest, the fruits will be very large, and their color will be pale yellow to orange-brown, depending on the variety. The wall of a harvestable fruit will give slightly under gentle thumb pressure. Cut open, scrape out seeds and pulp, ferment 48-72 hours, stirring frequently; rinse or decant, drain, spread out in a thin layer in a place with very good airflow away from rodents.
Eggplant (Solanaceae): Solanum melongena
Harvest and processing tips: Eggplant seeds are still very immature when the fruit is edible. Leave edible eggplant on the plant for an additional 2-3 weeks. For harvest, purple fruits will turn a dull brown, and white eggplants will often turn yellow. To confirm harvest readiness, cut open one or two fruits and confirm that all of the seeds are dark.
Good options for processing:
- Blend the lower seed-containing part of the fruit with water in a food processor (use a thick plastic blade, or wrap tape around metal blades to avoid damaging seeds), then rinse and decant multiple times until the seed is clean.
- Grate the lower seed-containing part of the fruit. Put gratings and any loose seed in a container that can hold at least twice the volume. Add water to within 2 inches of the rim, and squeeze by hand until very few seeds are left in the flesh. Then rinse and decant multiple times until the seed is clean. Spread seeds out on a wicking material to dry in a thin layer with good airflow.
Kale/Collards (Brassicaceae): Brassica oleracea
Growing tips: For the seed crop in the Western Region, kale is usually seeded into flats from June 20–July 15 and transplanted 3 to 4 weeks after emergence. These plants are overwintered in the field. This crop is the traditional European-style kale, which should not be confused with the ‘Red Russian’ type, which is Brassica napus, the same species as rutabaga. European kale (B. oleracea) will not cross with the ‘Red Russian’ types or Siberian kales, but will cross readily with broccoli, Brussels sprouts, cabbage, cauliflower, collards and kohlrabi. Kale can benefit from staking in the field.
Harvesting and processing tips: Harvesting and processing for kale should follow steps outlined in the cabbage description.
Lettuce (Asteraceae): Lactuca sativa
Growing Tips: Lettuce is a long-season annual crop. The seed matures between 12 and 21 days after flowering. On any given lettuce plant, the flowers do not mature all at once; instead, they mature sequentially. The expansion of the pappus from the seed beak, called feathering, signals seed cluster maturation. Seed harvest may begin when 30-80% of seed clusters display feathering, depending on methods and conditions.
Harvesting and Processing Tips: For commercial seed production, lettuce seed is normally harvested all at once; however, on a small scale or with ample labor, it may also be harvested multiple times in the field.
Good options for lettuce seed harvest:
- Multiple harvests. Harvesting repeatedly is typically done by hand. The first harvest occurs when one-third of the seed heads have feathered. Each plant is shaken into a sack or bucket. A second harvest is repeated in 1 to 2 weeks, when significant new feathering is visible. Sometimes, 3rd and 4th harvests can be made, but the seed may be unacceptably poor quality. Multiple hand harvesting can result in more seed yield and higher seed quality. However, it requires more labor.
- Single harvest – mechanical. When approximately 50% of the flowers have feathered, the crop is swathed. After 3 or 4 days, the seed is harvested and threshed with a combine. Harvest should happen in the late morning, so that residual morning moisture can reduce losses due to shattering. The combine will either have pickup guards on the header and a reel, or a belt pick-up without a reel. Because lettuce seed is small and delicate, the concave needs to be opened, the air needs to be set low, and the cylinder should be slow. Many growers find a 10-20% reduction in germination when lettuce is machine-harvested, both because immature seed is harvested and because mechanical threshers can damage the seed.
- Single harvest – hand. Gathering Together Farm in Philomath, Oregon has developed an improved single harvest method. In their method, the lettuce plants are pulled and windrowed with the plant roots intact. Most of the plant, including the seed head, is placed onto geotextile landscape fabric to catch shattering seed. The plant roots are placed off of the fabric to avoid soil contamination in the gathered seed. The plants are harvested with the roots to continue providing energy to the maturing seed plants, which may continue to flower daily and mature seed for up to a week. The geotextile fabric wicks moisture away from the seed plants but “breathes,” allowing incidental rain to pass through rather than puddle as it will with a tarp. The plants should be left to dry until the leaves are crisp. In the event of a forecast for prolonged precipitation, roots may be removed, and plants rolled up into round “bales” that will shed rain for a few days of bad weather. Lettuce seed is light. To clean it, winnow multiple times, and a 6 x 24 screen with rectangular or oval slots is useful.
Melon (Cucurbitaceae): Cucumis melo
Harvest and processing tips: At the point of edibility, you have some options for harvest: a) if getting to eat perfectly ripe melon is more important to you than extracting the maximum number of fully mature seeds, promptly harvest the melon, eat it, and reserve the seeds b) if the fruits are not at risk of damage or disease in the field, and you want more prime melon seed, allow them to remain on the vine until they have softened slightly, but extract seed before they show any signs of serious decay. c) If the fruits are at risk of damage or disease in the field, harvest the fruits right away and store at 65-75°F (18-24°C) for 7-10 days (until melons are beginning to soften, but are not rotting) before extracting seed.
Good options for processing:
- Cut open, scrape out seeds and pulp, rinse or decant. Cut open, scrape out seeds and pulp, soak for 8-12 hours, rinse or decant
Onion (Alliaceae): Allium cepa and Leek (Alliaceae): Allium ampeloprasum
Growing Tips: Onions and leeks are biennial crops and require vernalization. They can benefit from staking in the field.
Harvesting and Processing Tips: Mature onion seed is dull black, hard, and completely dry. A good rule of thumb is that when there is about a 1-inch-wide patch of black seed showing at the top of the umbel, it’s time to cut the crop. Several different methods are used. The most common method is to cut the umbel, leaving about 6 inches of the seed stalk attached and piling the material on paper in the field. Paper is used so that condensation does not form on the ripening seed. Some people have begun to use ground cloth-type materials under the crop and then cover the crop with plastic if rain threatens. Smaller-sized crops can also be moved into an unused greenhouse or other building as long as it has good airflow. Make sure the piles are no more than 2 feet deep and kept loose and airy to allow good airflow. The later-maturing seed will use moisture from the seed stalks attached to the umbel to continue maturing.
Once all of the seed is mature, threshing can begin. Check the seed for full maturity by biting or cutting into the seed from the lower parts of the umbel. The seed should be completely dry. If the endosperm is not fully ripe, the inside of the seed will be soft or “doughy”. This soft seed is very easily damaged during the threshing process. Usually about 10-14 days in sunny field conditions is enough to get the seed fully mature.
Onion seed needs to be threshed very carefully as the seed coat is very thin. Aggressive threshing with a combine often leads to microscopic cracks in the seed coat that greatly diminish storability. Combines are often equipped with rubber beater bars to minimize the damage. Because onion seed shatters very easily, small amounts of seed can be extracted by beating the umbels inside a plastic trash can. A great deal of seed generally shatters on the paper or other drying surface. This seed can be carefully swept up and cleaned with the rest of the seed.
A good, quick way to check onion seed for initial quality or to clean small parts of dry matter is to add the seed to a bucket of water. Good seed will sink. Poor seed and small plant material will float and can be poured off. Wet seed should be quickly laid out in a thin layer to dry with good air circulation.
Pepper (Solanaceae): Capsicum spp.
Harvest and processing tips: Peppers are ready for seed harvest when their color development is complete and uniform. Most pepper varieties are completely red when they are ready for seed harvest, but others are yellow, green, orange, purple, or brown. Peppers are particularly susceptible to disease, and can be moldy in the core even when the outside of the pepper looks healthy. To address this, monitor for decay as your peppers reach full color development by cutting some open. The cores should have no mold, and the seeds should be ivory, yellowish, or orangish; brown or very dark seeds are not viable. If the peppers you cut open are showing signs of decay, you may need to harvest them early and continue their ripening in a protected location at about 65- 75°F (18-24°C). For maximum seed quality, store peppers that have reached complete color development at about 65-75°F (18-24°C) for 7-10 days before extracting the seed. Cut this after-harvest ripening time short, or eliminate it, if your peppers show any sign of decay.
Good options for processing:
- Blend fruits with water in a food processor (use a thick plastic blade, or wrap tape around metal blades to avoid damaging seeds), rinse or decant.
- Remove cores from peppers, scrape seeds off of cores with a knife, rinse or decant.
- Remove cores from peppers, soak cores 8-12 hours, rub seeds off with gloved hand, rinse or decant.
- Break open fruits and rinse.
- For thin-fleshed peppers: dry peppers, then use dry-seeded processing procedures.
Radish (Brassicaceae): Raphanus sativus
Growing Tips: Radishes can be either annual or biennial, depending on the variety. Radishes are cool-season crops that, to produce superior roots, are best grown at temperatures that rarely exceed 80°F (26 °C). During seed set and maturation, radish seed crops can tolerate slightly higher temperatures. As with other root crops, radishes can only be properly maintained for trueness to type when grown using the “root-to-seed” method, which allows for selection of the roots before seed production begins. Radishes are first planted closely, harvested to evaluate superior roots upon maturity, and then re-planted with wider spacing to prepare for seed production. You may also choose the “seed-to-seed” method where you plant the radish seeds, make visual selections while the roots are still in the ground, and allow remaining plants to go to seed. This method will not allow you to select for root shape as well as the root-to-seed method.
Harvest and processing tips: Radish seed crops mature in approximately 150 days depending on variety, climate, and planting date. Radish seed is ready to harvest when about 60 to 70% of the seed pods turn from a green-yellow to brown and lose their fleshy appearance, becoming papery thin and light.
For small plots, hand harvest entire seed stalks with pruning shears or clippers. One grower utilizes a chainsaw to cut large stands in the field. Windrow and dry in the field, on ground cover if possible. If further drying is necessary, place pods on wire mesh tables to allow air circulation. Pods should be brittle when sufficiently dried. Dry for 10 – 14 days depending on weather conditions and relative humidity.
There are several methods for processing radish seed on a small scale (less than 50 lbs):
- Place pods in a sturdy bag and stomp until seeds break loose from pods.
- Place seeds on a tarp and walk on them with soft-soled shoes.
- Hand method: break pods by hand (with gloves!) to keep seed clean and allow for sorting as you clean.
- Place plants on a large tarp, put another tarp on top of the plants, and drive over the plants with a vehicle.
Remove seed from crushed pods by hand screen, gravity table, box fan, or mechanized screen cleaner. If using hand screens, a 9/64 in. round hole will allow seeds to pass through and chaff to remain on top of the screen. A 5/64 in. hole can then be used to remove small debris and chaff and allow the seed to stay on top. Winnowing with a box fan can be used to further clean seed.
For processing on a large scale (50 lb or more), a small combine can be used as a thresher by hand feeding the entire seed stalk through. Feed the thickest part of the stalk first to prevent over-feeding of the thresher. Make sure the distance between the rollers is at least 1.5 times the thickness of the largest seeds. The cylinder speed of the combine should be less than 700 rpm to avoid crushing the seed. Repeat cleaning section as detailed above.
Spinach (Chenopodiaceae): Spinacia oleracea
Growing tips: Spinach is a cool-weather annual. It must be planted in early spring (by late April in the Pacific Northwest) to grow a large enough plant before bolting to produce a good seed set. Spinach flowering is triggered by increasing day length. Spinach seed requires a unique climate limited to cool, wet springs followed by cool summers [temperatures not exceeding 75°F (24°C)] and relatively dry fall weather for harvesting. Especially during pollination and early seed development, temperatures that exceed 75°F (24°C) can dramatically lower germination rates, seed size, and yield.
Harvest and processing tips: Spinach seed is ready for harvest when 60 to 70% of the seed is a brownish color. However, some varieties differ, and plant diseases can allow the same overall appearance. To ensure maturity, the seed must be opened and inspected for color; the inside of the seed transforms from translucent or milky at the beginning of maturity to grayish or flinty in the middle, and then to a final, mature, starchy, whitish color. The plant is mature when the majority of the interiors of these seeds are a starchy white color.
To harvest spinach seed, cut the plants near the base of the stems to stack into windrows. This should be done preferably during a warm, dry period. The windrowed stalks will be ready to thresh in 4-10 days, depending on the weather. Rotating stalks in the windrows facilitates uniform drying of the seed. Once plants are dry, they may be first threshed by stripping stalks by hand and discarding stems. Seed clusters and leaves must then be threshed further to break apart seed clusters. This second step of threshing may be done by placing seed clusters in Rubbermaid buckets at least 1 ft thick and stomping with a twisting motion. Once broken down, the extra chaff and dust may easily be removed by winnowing with a fan. The threshing and winnowing process may need to be repeated several times. Seed may also be further cleaned with screens. A 9 or 10 size screen may be used to scalp off larger materials and a size 6 screen used to retain seed and remove smaller debris.
Squash, Summer (Cucurbitaceae): Cucurbita pepo
Harvest and processing tips: The seeds of summer squash are still very immature when the fruit is edible. Leave edible summer squash on the vine for around 6 weeks. Wait for fruits to become very large and hard (you should not be able to dent the flesh with your thumbnail) and for the stem to completely dry. Once the squash reaches this stage, you have options for harvest; a) if the fruits are not at risk for disease or damage, allow the squash to remain on the vine until right before the first hard frost, or b) if the fruits are at risk for disease or damage, harvest the fruits right away and store at 65-75°F (18-24°C) for a few weeks before extracting seed. Seed quality improves the longer the seed stays in the fruit without rotting.
To process the seed: Cut open, scrape out seeds and pulp, ferment for 8-12 hours (optional), spray seed and debris through a ½” screen to remove large debris, and rinse seed with a ¼” or ⅛” screen for small-seeded varieties to remove small debris. Spread seed into a thin layer in a space with good airflow away from rodents.
Squash, Winter and Fall (Cucurbitaceae): Cucurbita pepo
Harvest and processing tips: At the point of edibility, you have some options for harvest; a) if the fruits are not at risk for disease or damage, allow the squash to remain on the vine until right before the first hard frost, or b) if the fruits are at risk for disease or damage, harvest the fruits right away and store at 65-75°F (18-24°C) for a few weeks. In either case, note that squash seed left in the fruit reaches its highest level of quality after two months in cool storage, then quality declines. So, once you have brought your squash in from the field, or after it has sat for a few weeks at 65-75°F (18-24°C), store the squash at 50-55°F (10-13°C) for two months and then extract the seed. If maximum quality isn’t necessary, extract squash seeds as you eat your stored squash through the winter.
To process the seed: Use the same method as for summer squash, above.
Tomato (Solanaceae): Solanum lycopersicum
Harvest and processing tips: At the point of edibility, you have some options for harvest:
- Promptly harvest the tomatoes, extract the seeds, and eat the flesh. Use this option if getting to eat perfectly ripe tomatoes is more important to you than extracting the maximum number of fully mature seeds, or
- If you want prime tomato seed, harvest the fruits when they are starting to soften, but before they show signs of decay.
Good options for processing:
- Squeeze/scrape out seeds, ferment 1-4 days, stirring daily until gel capsules surrounding the seed have dissolved, decant, rinse, and spread seed out to dry.
- Crush whole tomatoes; ferment 1-4 days, stirring daily until gel capsules surrounding the seed have dissolved; decant, rinse, and spread seed out to dry.
Watermelon (Cucurbitaceae): Citrullus lanatus
Harvest and processing tips: At the point of edibility, you have some options for harvest; a) if getting to eat perfectly ripe watermelon is more important to you than extracting the maximum number of fully mature seeds, promptly harvest the watermelon, eat it, and reserve the seeds, or b) if the fruits are not at risk of damage or disease in the field, and you want more prime watermelon seed, allow them to remain on the vine until they have softened slightly, but extract seed before they show any signs of serious decay, or c) if the fruits are at risk of damage or disease in the field, harvest the fruits right away and store at 65-75°F (18-24°C) for 7-10 days (until they begin to soften but are not rotting) before extracting seed.
Good options for processing:
- Eat watermelon, spit out seeds, rinse.
- Remove seeds and flesh from rind, rinse or decant.
- Remove seeds and flesh from rind, ferment for 12-24 hours, rinse or decant
Crop-Specific Chart: Specifics for managing pollination, isolation, and population sizes
| Common name | Scientific name | Pollination | Life cycle | Self-pollinating/ Outcrossing | Minimum isolation distance: Home use | Minimum isolation distance: Commercial production | Minimum population size for genetic maintenance | Comments |
|---|---|---|---|---|---|---|---|---|
| Arugula | Eruca sativa | Insects | Annual | Strongly outcrossing | 1600 ft | 1 mi | 80 | |
| Basil | Ocimum basilicum | Insects | Annual | Strongly outcrossing | 1600 ft | 1 mi | 80 | |
| Bean, Common | Phaseolus vulgaris | Self | Annual | Generally self-pollinating | 10 ft | 20 ft | 10 – 20 | |
| Bean, Fava | Vicia faba | Self, insects | Annual | Both self-pollinating and outcrossing | 800 ft | 0.3 – 0.6 mi | 40 | Includes bell beans |
| Bean, Lima | Phaseolus lunatus | Self, insects | Annual | Generally self-pollinating | 40 ft | 160 – 320 ft | 40 | |
| Bean, Runner | Phaseolus coccineus | Self, insects | Annual | Both self-pollinating and outcrossing | 800 ft | 0.3 – 0.6 mi | 40 | |
| Bean, Cowpea | Vigna unguiculata | Self, insects | Annual | Both self-pollinating and outcrossing | 160 ft | 320 – 640 ft | 40 | Crosses w/ asparagus bean |
| Beet | Beta vulgaris | Wind | Biennial | Strongly outcrossing | 3200 ft | 1 – 3 mi | 80 | Crosses w/ chard, mangels & sugarbeets |
| Broccoli | Brassica oleracea | Insects | Annual or biennial | Strongly outcrossing | 1600 ft | 1 – 2 mi | 80 | Crosses w/ all B. oleracea crops |
| Brussels Sprouts | Brassica oleracea | Insects | Biennial | Strongly outcrossing | 1600 ft | 1 – 2 mi | 80 | Crosses w/ all B. oleracea crops |
| Cabbage | Brassica oleracea | Insects | Biennial | Strongly outcrossing | 1600 ft | 1 – 2 mi | 80 | Crosses w/ all B. oleracea crops |
| Carrot | Daucus carota | Insects | Biennial | Generally outcrossing | 1600 ft | 1 – 2 mi | 200 | Crosses w/ Queen Anne’s Lace |
| Cauliflower | Brassica oleracea | Insects | Biennial | Strongly outcrossing | 1600 ft | 1 – 2 mi | 80 | Crosses w/ all B. oleracea crops |
| Celery | Apium graveolens | Insects | Biennial | Strongly outcrossing | 1600 ft | 1 – 2 mi | 80 | Crosses w/ celeriac |
| Celeriac | Apium graveolens | Insects | Biennial | Strongly outcrossing | 1600 ft | 1 – 2 mi | 80 | Crosses w/ celery |
| Chard, Swiss | Beta vulgaris | Wind | Biennial | Strongly outcrossing | 1600 ft | 1 – 3 mi | 80 | Crosses w/ beets, mangels & sugarbeets |
| Chicory, Witloof | Cichorium intybus | Insects | Biennial | Strongly outcrossing | 1600 ft | 1 – 2 mi | 80 | Crosses w/ wild chicory, radicchio, and Italian dandelion |
| Cilantro | Coriandrum sativum | Insects | Annual | Generally outcrossing | 1600 ft | 1 – 2 mi | 80 | |
| Collards | Brassica oleracea | Insects | Biennial | Strongly outcrossing | 1600 ft | 1 – 2 mi | 80 | Crosses w/ all B. oleracea crops |
| Corn | Zea mays | Wind | Annual | Generally outcrossing | 1600 ft | 1 – 2 mi | 200 | |
| Cucumber | Cucumis sativus | Insects | Annual | Generally outcrossing | 1600 ft | 1 – 2 mi | 10 – 20 | Armenian cucumber is C. melo |
| Dill | Anethum graveolens | Insects | Annual | Generally outcrossing | 1600 ft | 1 – 2 mi | 80 | |
| Eggplant | Solanum melongena | Insects | Annual | Generally outcrossing | 1600 ft | 1 – 2 mi | 80 | |
| Endive | Cichorium endivia | Self | Biennial | Strongly self-pollinating | 10 ft | 20 ft | 10 – 20 | |
| Escarole | Cichorium endivia | Self | Biennial | Strongly self-pollinating | 10 ft | 20 ft | 10 – 20 | |
| Kale, European | Brassica oleracea | Insects | Biennial | Strongly outcrossing | 1600 ft | 1 – 2 mi | 80 | Crosses w/all B. oleracea crops |
| Kale, Siberian | Brassica napus | Insects | Biennial | Strongly outcrossing | 1600 ft | 1 – 2 mi | 80 | Crosses w/ rutabaga and canola |
| Leek | Allium ampeloprasum | Insects | Biennial | Generally outcrossing | 1600 ft | 1 – 2 mi | 80 | |
| Lettuce | Lactuca sativa | Self | Annual | Strongly self-pollinating | 10 ft | 20 ft | 10 – 20 | Crosses w/ wild lettuce |
| Melon | Cucumis melo | Insects | Annual | Generally outcrossing | 1600 ft | 1 – 2 mi | 10 – 20 | Crosses w/ Armenian cucumber |
| Mustard greens | Brassica juncea | Insects | Annual or biennial | Strongly outcrossing | 1600 ft | 1 – 2 mi | 80 | |
| Okra | Abelmoschus esculentum | Self, insects | Annual | Both self-pollinating and outcrossing | 800 ft | 0.3 – 0.6 mi | 40 | |
| Onion | Allium cepa | Insects | Biennial | Generally outcrossing | 1600 ft | 1 – 2 mi | 200 | |
| Parsley | Petroselinium crispum | Insects | Biennial | Generally outcrossing | 1600 ft | 1 – 2 mi | 80 | |
| Parsnip | Pastinaca sativa | Insects | Biennial | Generally outcrossing | 1600 ft | 1 – 2 mi | 80 | |
| Pea | Pisum sativum | Self | Annual | Strongly self-pollinating | 10 ft | 20 ft | 10 – 20 | |
| Pepper, Hot | Capsicum spp. | Self, insects | Annual | Both self-pollinating and outcrossing | 800 ft | 0.3 – 0.6 mi | 40 | Must isolate equally from hot and sweet peppers |
| Pepper, Sweet | Capsicum annuum | Self, insects | Annual | Generally self-pollinating | 160 ft | 320 – 640 ft | 10 – 20 | Must isolate from hot peppers using hot pepper isolation distances |
| Pumpkin, Halloween | Cucurbita pepo | Insects | Annual | Generally outcrossing | 1600 ft | 1 – 2 mi | 10 – 20 | Most Jack O’lantern vars are C. pepo and will cross w/ C. pepo squash |
| Pumpkin, Other | Cucurbita spp. | Insects | Annual | Generally outcrossing | 1600 ft | 1 – 2 mi | 10 – 20 | Learn the species of each variety |
| Radicchio | Cichorium intybus | Insects | Biennial | Strongly outcrossing | 1600 ft | 1 – 2 mi | 80 | Crosses w/ wild chicory, radicchio, and Italian dandelion |
| Radish | Raphanus sativus | Insects | Annual | Strongly outcrossing | 1600 ft | 1 – 2 mi | 80 | May cross w/ wild radish |
| Rutabaga | Brassica napus | Insects | Biennial | Strongly outcrossing | 1600 ft | 1 – 2 mi | 80 | Crosses w/ Siberian kale and canola |
| Spinach | Spinacea oleracea | Wind | Annual | Strongly outcrossing | 3200 ft | 1 – 3 mi | 80 | |
| Squash, Summer | Cucurbita pepo | Insects | Annual | Generally outcrossing | 1600 ft | 1 – 2 mi | 10 – 20 | |
| Squash, Winter | Cucurbita pepo | Insects | Annual | Generally outcrossing | 1600 ft | 1 – 2 mi | 10 – 20 | |
| Squash, Winter | Cucurbita maxima | Insects | Annual | Generally outcrossing | 1600 ft | 1 – 2 mi | 10 – 20 | |
| Squash, Winter | Cucurbita moschata | Insects | Annual | Generally outcrossing | 1600 ft | 1 – 2 mi | 10 – 20 | |
| Squash, Winter | Cucurbita argyrosperma | Insects | Annual | Generally outcrossing | 1600 ft | 1 – 2 mi | 10 – 20 | Formerly Cucurbita mixta |
| Tomato, modern | Solanum lycopersicum | Self | Annual | Strongly self-pollinating | 10 ft | 20 ft | 10 – 20 | If multiple tomato types are present, use the greatest isolation distance |
| Tomato, Potato Leaf or Heirloom | Solanum lycopersicum | Self, insects | Annual | Generally self-pollinating | 40 ft | 160 – 320 ft | 10 – 20 | If multiple tomato types are present, use the greatest isolation distance |
| Tomato, Currant | Solanum pimpinelifolium | Self, insects | Annual | Both self-pollinating and outcrossing | 160 ft | 320 – 640 ft | 40 | If multiple tomato types are present, use the greatest isolation distance |
| Turnip | Brassica rapa | Insects | Biennial | Strongly outcrossing | 1600 ft | 1 – 2 mi | 80 | Crosses w/ many Asian greens |
| Watermelon | Citrullus lanatus | Insects | Annual | Generally outcrossing | 1600 ft | 1 – 2 mi | 10 – 20 |
References and Resources
Books
Basic Seed Saving. McDorman, Bill. 1994. International Seed Saving Institute.
The Biology of Seeds: Recent Research Advances. Nicola, G., K.J. Bradford, D. Come, M. Curie, and H. Pritchard. 2003. CABI Publishers, Cambridge, MA.
Breed Your Own Vegetable Varieties: The Gardener’s and Farmer’s Guide to Plant Breeding and Seed Saving. Deppe, Carol. 2000. Chelsea Green Publishing, Vermont.
Collecting, Processing and Germinating Seeds of Wildland Plants. Young, J.A. and C.G. Young. 1986. Timber Press, Portland, Oregon.
Flower Seeds: Biology and Technology. McDonald, M.B. and F.Y. Kwon. 2004. CABI Publishers, Cambridge, MA.
From Seed to Bloom. Powell, Eileen. 1995. Storey Books.
Garden Seed Inventory: An Inventory of Seed Catalogs Listing All Non-Hybrid Vegetable Seeds Available in the United States and Canada. Whealy, Kent. 2000. Seed Saver Publications.
Heirloom Vegetable Gardening: A Master Gardener’s Guide to Planting, Seed Saving and Cultural History. Weaver, William Woys. 1999. Henry Holt and Co. Inc.
Hybrid Seed Production in Vegetables: Rationale and Methods in Selected Crops. Basra, A.S. 2000. Food Products Press, New York, NY.
Principles of Seed Science and Technology. Copeland, L.V. 1976. Burgess Publishing Company, Minneapolis, MN.
Saving Seeds: The Gardener’s Guide to Growing and Storing Vegetable and Flower Seeds. Roger, Marc. 1990. Storey Books, Vermont.
Seed Production Principles and Practices. McDonald, M.B. and L.O. Copeland. 1997. Chapman and Hall, New York, NY.
Seed Sowing and Saving: Step-By-Step Techniques for Collecting and Growing More Than 100 Vegetables, Flowers and Herbs. Turner, Carole B. 1998. Storey Books, Vermont.
Seed to Seed. Ashworth, S. 1991. Seed Savers Publications, Decorah, IA.
Seeds: Ecology, Biogeography and Evolution of Dormancy and Germination. Baskin, Carol C. and Jerry M. Baskin. 1998. Academic Press.
Seeds Handbook: Biology, Production, Processing, and Storage. Desai, B.B., P.M. Kotecha, and D.K. Salunkhe. 1997. Marcel Dekker, Incorporated, New York, NY.
Vegetable and Flower Seed Production. Hawthorn, L.R. and L.H. Pollard. 1954. Blackiston Co., New York, NY. Out of print.
Vegetable Seed Production. George, R.A.T. 1999. CABI Publishing, New York, NY.
Seed Cleaning Resources
© 2026 Organic Seed Alliance
Educational Materials: This report is protected under a Creative Commons license: Attribution, Non-Commercial, and Share Alike. We believe in protecting intellectual property (IP) in a manner that promotes creativity and innovation in the interest of the public good. We encourage you to learn more about the Creative Commons, the open source movement, and other alternative IP models.
Organic Seed Alliance is the license holder of this report. You are free to share (to copy, distribute, and transmit the work) and remix (to adapt the work) under these conditions:
- Attribution: You must attribute the work in the manner specified by the author or licensor (but not in any way that suggests they endorse you or your use of the work).
- Noncommercial: You may not use this work for commercial purposes.
- Share Alike: If you alter, transform, or build upon this work, you may distribute the resulting work only under the same or similar license to this one.
For any reuse or distribution, you must make clear to others the license terms of this work. The best way to do this is with a link to the Creative Commons web page: creativecommons.org. Any of the above conditions can be waived if you get permission from the copyright holder. Nothing in this license impairs or restricts the author’s moral rights. Your fair use and other rights are in no way affected by the above.
Engage with Organic Seed Alliance